
Muscles Worked in the Deadlift

Primary muscles worked:
Secondary muscles worked:
How to Deadlift with Proper Form
- Step up close to the bar so that it is about over the middle of your foot.
- Inhale, lean forward, and grip the bar.
- Hold your breath, brace your core slightly, and lift the bar.
- Pull the bar close to your body, with a straight back, until you are standing straight.
- Lower the bar back to the ground with control.
- Take another breath, and repeat for reps.
Text and graphics from the StrengthLog app.
Introduction to the Deadlift
Deadlifting is one of the wisest things you can do with a barbell.
It strengthens your body from head to toe and puts on slabs of muscle all over you. Deadlift training builds a resilient back and hardens your body into injury-proof armor.
It is a competitive lift in powerlifting (which I compete in) and is used in athletes’ training in almost every sport.
In this guide you’ll learn:
- How to deadlift effectively and safely.
- How to train the deadlift to get big and strong.
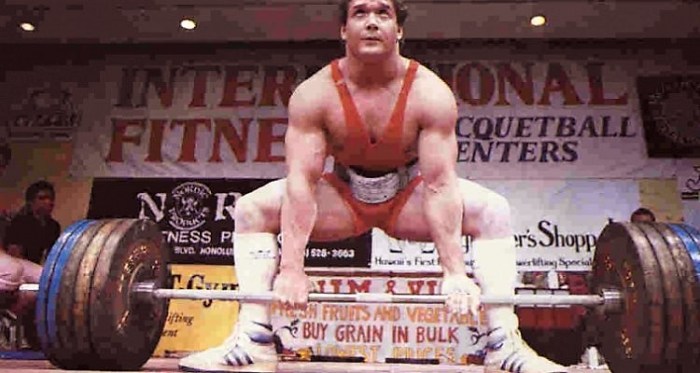
We’ll begin with a simple demonstration and a general explanation of the deadlift technique.
The deadlift is performed by simply lifting a barbell off the ground to the level of your hips, and then lowering it back to the ground.

Some trainers over-complicate the deadlift (and the squat and bench press) to the point of rocket science.
While I am obsessively interested in the deadlift and will pour much of that into this article, I also know that less is more when you’re learning a new lift.
In reality, deadlifts are extremely simple to do.
Preparation
- Set a bar on the floor, preferably loaded with full-sized weight plates (45 cm / 17.72 in).
How to Deadlift with Proper Form:
- Step up close to the bar so that it is positioned about over the middle of your foot.
- Bend over and grip the bar with hands about shoulder-width apart.
- Inhale, brace your core, and lift the bar by extending your hips and knees.
- Pull the bar close to your body until you are standing straight up, with hips and knees locked out.
- Lower the bar back to the ground.
For a demonstration of both the set-up and the lift, here’s a video of me deadlifting 260 kg in a powerlifting competition last year:
Major Muscles Worked in the Deadlift
Which muscles does the deadlift work?
You’ve already seen this once, but let’s recap quickly.
These are the muscles that need to be strong in order to be strong in the deadlift, and it is the muscles that primarily (and secondarily) will grow and get stronger from deadlift training.
Primary muscles worked:
Secondary muscles worked:
While more muscles are involved as stabilizers and synergists, these are the main muscles involved in producing the force necessary to lift the bar.1 2
Deadlift Training Programs and Optimal Technique
That was the basics on how to deadlift, and you are more than ready to start practicing the lift with a light weight.
The deadlift takes years and years to master, so you might as well get started.
For the rest of this article, we’ll delve into the more advanced stuff:
- Optimizing your technique
- How to get stronger in the deadlift
- Deadlift training programs for the …
- Beginner
- Intermediate
- Advanced
Read on, friend.
Optimizing Your Deadlift Technique
With the basics out of the way, let’s look at how you can optimize your deadlift technique for you. How do different technique alterations affect your deadlift performance, what muscles it works, and its safety?
Probably the biggest technical decision is whether you should deadlift …
Conventional or Sumo?
The two common ways to deadlift are the conventional and sumo deadlift.
- Conventional is the more common variant of the two, as its name indicates. In the conventional deadlift, you grip the bar with your arms outside your knees, and you typically keep your feet about hip-width apart.
- Sumo is probably mostly used inside the sport of powerlifting and gets its name from its similarity to the sumo wrestler’s stance. In the sumo deadlift, you grip the bar with your arms inside your knees, and your stance can be so wide that your toes almost touch the weight plates.

Biomechanical Differences Between Conventional and Sumo Deadlifts
- Trunk angle. The conventional deadlift leads to a greater forward lean of your torso, while the sumo deadlifts let you keep your torso a bit closer to vertical. This means sumo deadlifts generally are a bit easier on your lower back – about 10% easier.3
- Knee extension. Your quads pick up the slack left from your lower back in the sumo deadlift. While conventional deadlifts are pretty easy on your quads, the sumo taxes them rather hard.
- Hip extension. Hip extension demands are quite similar in the two styles, even if they do target the hip in slightly different ways: sumo deadlifts require more hip adduction, while conventional deadlifts require more hip extension in the sagittal plane (front to back). This does not, however, result in any difference in glute activation between the two.
- Total work and energy expenditure is higher in the conventional deadlift due to the greater vertical distance the bar travels. This should not be confused with the peak force required to complete the lift, however. Your ability to produce force is what will limit your 1RM in the deadlift, not the total amount of work done.
Which Style is the Strongest: Sumo or Conventional?
That will probably depend on you, buddy.
Different body shapes and sizes, muscle insertions and origins, limb length and pelvises, strengths and weaknesses will all contribute to wether conventional or sumo deadlifts suits you better.
One clue, however, might simply be how big you are. MyStrengthBook made a brilliant job at analyzing and presenting the math from 2016 years IPF Classic Powerlifting World Championship, and found a strong correlation between bodyweight and deadlift style for both sexes.
The lower the weight class, the greater the number of athletes pulling with a sumo style, and vice versa. The breaking point (where the number of lifters pulling with each style is 50/50) seems to be at about ~90 kg for men and ~60 kg for women.


Now, this might be influenced by a number of factors (such as culture), but one possible explanation for this lies in the fact that conventional deadlifts are about 10% more demanding of your lower back. A bigger athlete probably has a bigger trunk, which in and of itself will act like a belt or cushion of sorts. This could theoretically aid in the conventional style by alleviating some of the work required of the spinal erectors.
A recent study measured the anthropometrics of 47 participants without any prior experience with deadlifting, and, after some introductory training to the two styles, tested their 1RM in both conventional and sumo deadlifts. 4 The only anthropometric predictor of which style was the strongest was their sitting height to total height ratio, which correlated with their sumo deadlift to conventional deadlift performance.
Put simply: participants with longer torsos were more likely to be stronger in sumo deadlifts than conventional.
Foot Position
Conventional versus sumo deadlifts aside – even within one and the same style you still have some freedom of choice regarding foot position.
A rule of thumb is to point your toes in the same direction that your knee travels. This is not set in stone, however, and you still have some leeway to divert from this.
In the conventional style you can choose to place your feet all the way together until your heels are touching. This will probably also require you to point your toes out a bit. More common and the best fit for most people, however, is to simply place the feet directly under your hip joints, with your toes pointing straight forward or only slightly out.

By pointing your toes outward and tracking in the same direction with your knees, you will effectively “shorten” your femurs compared to keeping them pointing straight ahead, and maybe make it a bit easier to pass the bar past your knees.
What you’ll want to avoid is a stance so wide that your knees push your arms out. You’ll want your arms to be perpendicular to the floor as seen from the front, as this will result in the shortest and strongest range of motion. With a wide grip, you’d have to lean over more to reach the bar, resulting in a weaker starting position.

It is a good idea to experiment a bit with different foot positions when you’re learning the deadlift, as your individual limb lengths will dictate what position suits you better. Lighter lifters with smaller thighs and bellies will find it easier to keep a narrow stance in the conventional deadlift, while super heavyweights and heavy strongmen often adopt a conventional deadlift style with a rather wide stance.
In the sumo style you can choose to place your feet all the way out to the weight plates, or as close together as possible while still keeping your knees outside your arms – also known as semi sumo and popularized by legendary powerlifter Ed Coan.
With your femurs pointing more to the side in the sumo deadlift compared to the conventional, you’ll probably want to follow that same direction with your toes and point them more outward. A limitation here will be balance – the more you point your toes out, the more you’ll shorten your base of support in the sagittal plane, thus making it more difficult to maintain balance during the lift.
Arms
The best visualization of your arms’ roles in the deadlift is to act like ropes, attaching the bar to your shoulders. Preferrably, these should also be both long and straight ropes, as that will allow you to maximize your starting height in the lift.

The first few inches of a deadlift is the biomechanically weakest part of the lift, and the more you can extend your knees and hips from the start, the easier it will be to pass this point.5
If you deadlift with your arms bent or excessively wide, you will have to lean over more, and thus end up in a weaker starting position.

Another issue is injury risk – straight arms with relaxed biceps will likely minimize your risk of a bicep strain or even rupture while lifting heavy loads.
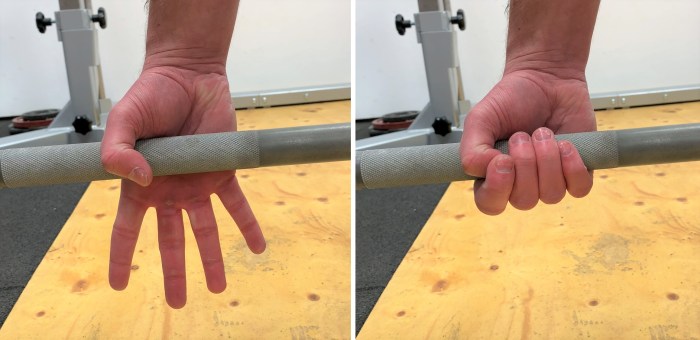
How to Grip the Bar
There are four common ways to grip the bar during deadlifts:
- Double overhand grip
- Hook grip
- Mixed grip
- Lifting straps (not allowed in most powerlifting competitions)
Double Overhand Grip

This is the standard, intuitive way to grab a barbell. You simply hold on to it with both palms facing your body (pronated), and the thumbs opposing the other fingers.
Pros:
- Comfortable and intuitive. The way you usually grab stuff.
- Symmetrical for your arms and shoulders.
Cons:
- Weak! The barbell will want to roll out of your grip. This grip technique is usually fine for beginners learning the deadlift form, but quickly becomes a greatly limiting factor for how much you can lift.
Hook Grip
The hook grip is common in weightlifting and is an evolution of the double overhand grip. Despite them being very similar, the hook grip increases the weights you can lift by 20–30% or more. You still grab the bar with a double overhand grip, with the difference that you stick your thumb under your index finger (and maybe also your middle finger). The thumb will act like a wedge or a chock and hinder the bar from rolling out of your grip.
Pros:
- Much stronger than a regular overhand grip.
- Symmetrical for your arms and shoulders.
Cons:
- Painful! It gets better with time, but will still be more uncomfortable than the normal way of gripping a bar.
- More wearing on your skin, limiting the volume you can do. This can be alleviated with lifting straps.
Mixed Grip

The mixed grip is the most common grip technique in powerlifting. Here, you counter the barbell’s rotation by supinating one hand – that is, turning one palm facing away from you. Like the hook grip, this greatly increases the weight you can lift.
Pros:
- Much stronger than a regular overhand grip.
- Not very painful or wearing on your skin (compared to hook grip)
Cons:
- Asymmetrical for your arms and shoulders, which might transfer to an asymmetrical spine and hip position. It is unclear, however, if this actually is a problem. Probably not.
Lifting straps

The last grip option worth mentioning here is the use of lifting straps. Lifting straps will remove any grip related limitations for your pulls, will spare your skin, and also enable you to pull with a symmetrical overhand grip. The downside is of course that you won’t reap the benefit of getting a stronger grip from your training. A good compromise for an avid deadlifter might be to use straps in about half of your deadlift training, if you feel that pain or damaged skin is holding you back.
Pros:
- Symmetrical for your arms and shoulders.
- Very strong – grip won’t be a limiting factor.
- Painless and spares your skin.
Cons:
- Won’t develop your grip strength.
- Not allowed in most powerlifting competitions and thus might give false security.
- One more thing to carry around in your gym bag.
Hip Position
How high should your hips be in the starting position of a deadlift? Should you begin in more of a “squat” position, or something more along the lines of a stiff-legged deadlift?
The answer can be deduced if we make three assumptions:
- You’re going to keep your arms vertical as seen from the side (or very close to vertical) during the entire lift.
- You’re going to keep the systems (your body + the bar = the system) center of mass roughly above your mid foot.
- You’re going to keep your shins as close to the bar as possible while still allowing for number 1 and 2 above, as that will enable you to more effectively use both your knee and hip extensors.
Number one above won’t be an issue – once the bar gets heavy enough, it’ll be positioned right below your shoulder joint, or at least very close to it.
But how do you find the position mentioned in point number two? Well, that’s the position in which you don’t lose your balance forward or backward during the pull – e.g. where you’ll automatically end up positioning the bar to keep your balance, without thinking about it. You can explore and reinforce this position by performing a pause deadlift, with the pause very low towards the floor.
Finally, keep your shins as close to the bar as possible while still doing number one and two above. For many of you, this will mean having your shins touching the bar.
These three points will have narrowed down your possible hip starting height quite a lot, but there is still some leeway regarding the exact height. The final adjustments of your hip position will depend on your personal strengths and weaknesses, especially in your back, hip and knee extensors.
- If you have a strong back and strong hip extensors but weak knee extensors, you’ll be the strongest (and naturally drift towards) when you are a little bit more bent over and thus shifting more of the load towards your hip.
- If you have strong knee extensors but a weaker back or weak hip extensors, you’ll be the strongest (and naturally drift towards) when you have a more vertical torso and your shins/knees closer to the bar (or even past the bar, for taller lifters).

Note that your ideal starting position probably is one that you already know and use. When we perform movements, we usually experience a bit of micro-variation. The movement simply doesn’t look exactly the same each rep, and if we by chance discover a slightly easier and more efficient way of performing a rep, we usually take notice – either consciously or subconsciously. That is why, as long as you’re not doing something fundamentally wrong – like keeping the bar way ahead of your shins – your current starting position is probably also your most effective one. At least right now.
As your body and musculature changes with continued training, so will your strengths and weaknesses change. That means that the most effective deadlift position in the beginning of your lifting career, might not be the same as your most effective lifting position when you are on your peak.
Do experiment with a slightly higher or lower hip position in the start – although my bet is that you’ll find that you’re either weaker with the new position, or will end up in your old position anyway when the load gets heavy enough.
Back Position in the Deadlift

Should you deadlift with a flat or rounded back? Or to use more anatomically correct terms: should you lift with your spine in a neutral or flexed position?
The short answer is that we recommend you to deadlift with a neutral spine. An exception might be powerlifters or strongmen/-women who are fine with exchanging a slightly heavier lift with a possibly greater risk of injury.
The long answer is that there are two aspects of this question to consider, namely:
How does the back position affect your …
- Performance?
- Injury risk?
Let’s have a quick look at both in turn.
Performance
Why is it that as lifters (especially newer ones) pile on more and more weight, they tend to round their back more and more? Likely, because it’s biomechanicaly efficient – at least in the initial pull from the ground.
By rounding your back, you are essentially “shortening” your spine, and bringing your hips closer to the bar. The closer your hips are to the bar, the shorter the moment arm that they are working against gets, and the more weight you can lift with the same force from your hips. In the picture above where I show a neutral and exaggeratedly rounded spine, my hips are about 10% closer to the bar when I round my back, as opposed to keeping it flat. All other things equal, that means my hip extensors will suddenly let me lift 10% more weight.

Rounding your back in the initial portion of a deadlift is therefore not entirely a stupid thing to do, strategy-wise. It is, however, short-sighted.
The lift ain’t over until you have extended your knees, hips and spine, and flexing your spine in the beginning of the lift means that you will have to re-extend it later on. Something that might be easier said than done.
Some lifters are able to pull it off, and for them it might be a viable lifting strategy for peak performance.
Other lifters (such as myself) prefer to keep the back extended throughout the whole lift. It makes the beginning of the lift harder, but the upside is that if you clear the bar of the first few inches of the ground, you typically got it.
Injury Risk
This is probably the most debated aspect of the back position in the deadlift. And just like many other aspects of training were there is alot of debate, the reason that there even is a debate in the first place is either because we don’t have definitive answers, or because there isn’t much of a difference between the two cases – or both.
Is one lifting style more prone to spinal injury than the other?
The best answer we have thus far is: We don’t know.
On the one hand, lifting with a flexed back increases the load on passive structures in your spine, such as your vertebraes or intervertebral discs.6 On the other hand, we know that even passive structures like the intervertebral discs are living tissue that adapts to the challenges we impose on it.7 8 That means that as you keep logging hours in the gym and gaining strength and muscle, your spine will get more resilient.
Neither does a neutral spine seem to offer protection against disc herniations or damage to vertebral endplates.9 10
So – Should You Deadlift With a Neutral or Flexed Spine?
Our practical, general recommendation is this:
- Strive for neutral. Strive to lift with a neutral back in all of your training and in competition. At the very least, this will raise the limit for what weight you can pull before your spine flexes.
- Don’t be greedy. Generally avoid lifting with a flexed back in your training – if you cannot maintain a neutral spine, lower the weight or perform less reps per set.
- Save it for the competition? Lifting with a flexed spine might increase your risk of injury – it also might not. An occasional lift with a flexed spine at competition is probably fine – most powerlifting injuries seem to creep up over time, rather than being acute.
Bracing
Bracing refers to the act of keeping your core rigid during a lift. Your spine is made up of 33 vertebrae, of which the first 24 can move to a degree in any direction. Without your core muscles keeping your spine rigid, you wouldn’t be able to deadlift.
The core musculature is made up of at least a dozen different muscles, both superficial (like your abs and spinal erectors) and deep (like your diaphragm and pelvic floor). The core muscles also surround your spine on all sides: the four abdominals (rectus abdominis, transversus abdominis, and the internal and external obliques) on the front and sides, and the large muscle group erector spinae on the back, are some of the larger ones.


Bracing a dozen or more core muscles apropriately for different lifting tasks requires great intermuscular coordination, and is generally best left to the body to figure out on it’s own through repeated practice of the specific lift.
You can, however, give the core some help on the way. To do this, start by taking a deep breath, about 80% of maximum. Then, it’s time to tense up your core muscles. My favourite way of teaching this is to stick your fingers into your sides, slightly above your hip bones. Then push your fingers out by tensing your core muscles. Practice this until you can do it without using your fingers, and then start doing it when you are deadlifting.
Realize that the core will have to brace in different ways depending on if you’re sitting comfortably in your chair and sticking your fingers into your sides, or if you’re deadlifting 400 pounds (or more), so while this manual bracing might help a bit in the beginning, you will still have to learn bracing by actually lifting a bar.
Building Tension
Deadlifts are hard. And if you’re going to pull one off, you’d better be too.
Effective deadlifting requires efficient force transfer. The force must be transferred from the bar, via your grip, arms and shoulders, through your torso down to your hips, and finally down via your legs and feet to the floor.
A key to effective force transfer is stiffness, and this ties in with the previous section on bracing. Your arms are going to be straight and stiff like ropes, and won’t have much give. Your legs are pretty much just straight bones connected by some of the prime movers, and stiffness won’t be an issue here either. The core however, with it’s pelvis connected to the spine with it’s 33 vertebrae is in great need of stabilization – especially in the conventional deadlift since it places greater demands on your low back. A braced and stiff core will be essential for effective force transfer, which is why it requires some special attention.
Before you push the pedal to the metal and revv up those strong prime movers in your back, hip and knee extensors, you’d better take a moment to make sure your core is good to go, and this is done by building tension. It is simply the act of preparing your body of what is about to come.
Now, this can be done in a few different ways, where probably the most common are:
- Consciously tensing your body. You contract the core muscles like we covered earlier, you engage your lats by driving the bar into your shins, and you grab the bar excessively hard to get an irradiation effect where the tonus of other muscles increase. This way you’ll build up tension throughout your body in a pretty conscious way.
- Gradually pushing down the gas pedal. The other way to go about it is by gradually exerting more and more force into the bar, perhaps over 1–3 seconds before the bar finally breaks the ground, as to give your body a chance to develop the right tension in the right places. This is more of a subconscious route of building tension, which might have the prerequisite of a bit experience with deadlifts.
- And of course, you might also combine both of the two tactics above into your own flavour of building tension.
The opposite of this might be the “dip, grip, and rip”-technique, which is performed quickly and is pretty self-explanatory. Realize that a true 1RM deadlift will never move quickly, but that doesn’t mean that you can’t initiate the pull quickly. This deadlift technique, quickly dipping down, grabbing the bar, and ripping it off the floor is also a viable one, but it comes with two additional conditions:
- Higher requisite of motor skill. You’ll still have to tense all the right muscles, but now you have less time to do it. That means you better have a very well ingrained groove for your deadlift motor pattern.
- Higher risk. Even if you are a very experienced deadlifter and are used to this style of pulling, you will still take a larger risk of mis-timing the lifting sequence compared to if you’d take your time more with it.
Our general recommendation is to be a bit more patient in the last moments before the pull, and take your time gradually building up tension before the bar breaks the floor.
Lift-Off
As previously mentioned, the starting position is generally your biomechanically weakest point in a deadlift. However, this does not mean that the beginning of a deadlift is where most lifters get stuck and fail their lift, but more on that in the section on the lock-out.
Even if it’s not your sticking point, the beginning is still very important and might still make or break your lift depending on:
- How much energy you will be wasting when you’re trying to get through it, and
- What position you are in when you clear the lift-off.
Since the starting position is generally the biomechanical weak spot, this is where, if you watch the deadlifting event in a powerlifting competition, you might see some funny stuff going on in the moments just before, during or after the bar breaks off the floor.
Or, you might see it in yourself: when the weight gets heavy enough and you begin to pull, you might start shifting around your body position. Perhaps you hadn’t nailed the right hip position or trunk angle, and as you begin exerting force into the bar your body naturally shifts to a stronger (or perceived stronger) position. Perhaps you are not strong enough to break the bar off the floor without rounding your back and thus decreasing the moment arms of your prime movers by bringing the bar closer to their respective joints.
The lift-off is really about nailing down two things:
- Knowing your strongest pulling technique, and …
- Using and maintaining your strongest pulling technique.
Your own strongest pulling technique will entail things like: how you distribute work between hip and knee extensors, what sequence and speed you will extend different joints in, and whether or not you are going to pull with a rounded or straight back.
While I on the one hand believe that your body is smart, and sometimes better left to figure out things on it’s own, this is not neccessarily one of those cases. Reason being, the start is a point where you might need to lift a little counter-intuitively.
One such example is when the butt shoots upward before the bar has barely begun to move. What has happened is that the lifter has effectively dumped over most if not all work from the quadriceps to the back and hip extensors. Now, this might be because the lifter simply is relatively much stronger in their posterior chain, and this deadlift technique just makes use of that strength. But it might also be the case that the lifter just doesn’t know how the start of a deadlift might feel, and is simply not patient enough for the quads and the hip extensors to hit their coordination and make the (maybe: more efficient) pull.
While the squat typically involves a simultaneous extension of hips and knees, the deadlift is more segmented into three distinct phases:
- Mostly knee extension
- Mostly hip extension
- Simultaneous knee and hip extension until lock-out
The graphs below illustrate this. They’re averages from an analysis of 25 competing powerlifters heaviest successful attempt at a competition, and show the ratio of knee extension (y-axis) to hip extension (x-axis). Notice the difference between the two lifts, and the segmented look of the deadlift.


Another positional shift that might happen during the lift-off is the (potentially) short-sighted “loan” that a lifter takes from the lock-out to pay the initial pull when they round their back. Yes, the first phase of the lift becomes easier due to shorter moment arms, but the lock-out becomes harder when you have to re-extend those facet joints between the vertebraes.
You will simply have to experiment to find out for yourself:
- Are you stronger when you let your butt shoot up in the start, or when your patiently push with your legs until the bar finally gives?
- Are you stronger when you deadlift with a straight back during the whole lift, or when you initally round your back but re-extend it during the lock-out?
Your individual optimal deadlift technique will vary, but if we yet again shall revert to generalizations, we believe that most lifters will eventually have their greatest performances when they patiently let their quadriceps contribute to the lift, resulting in a pronounced knee extension in the start, as well as pulling with a more or less straight back through the first phase of the lift, thereby ridding themselves the task of re-extending their spine.
So how do you go about accomplishing this? Both depend on grooving the right neuromuscular motor patterns, which in plain English means train a lot. With the desired technique. With progressively heavier weights, as you get increasingly good at maintaining your technique with heavier weights.
To train this, you will be needing some kind of feedback to discern whether you’re doing it right or wrong:
- A coach/friend/enemy who knows what to look for might give you feedback after a set or even after every rep.
- You could set up your phone to record your lift, and review the film in between your sets.
Besides getting feedback, there are some cues that generally are helpful to teach these aspects of the deadlift technique:
- Push the floor away, or pull the sword out of the rock. Meaning, instead of pulling the barbell up, you focus on pushing the floor away, or down. The King Arthur-analogy still entails pulling something up, but there’s something about it that still can make the right technique and “feeling” just click.
- Chest up. Maybe not as vivid a visualization, but this cue is one of the best to help a lifter maintain a more straight back.
Now we’ve covered the initial phase of the deadlift, which includes the weakest point of the lift.
The Lock-Out (and The Sticking Point)
So you’ve cleared the first part of the lift. While biomechanically the weakest part, that is not where the sticking point generally is. No, the most common sticking point in the deadlift is when you are pretty close to having the weight locked out, when your thighs are at about a 57± 5 degree angle relative to the floor.11
Here’s a chart showing the heaviest successful deadlift attempt from a powerlifting competition. The sticking point is defined as the point where the bar begins to accelerate again after having slowed down somewhere in the middle of the lift, and it is in this position that a lifters thigh angle generally is around 57 degrees (with just a small 5 degree standard deviation). The sticking point is marked with “P3”.

Note that the sticking point won’t necessarily be where you fail an attempt that is too heavy for you:
- If you try to lift a weight that way too heavy for you, it won’t budge from the floor.
- If you try to lift a weight that is a little bit too heavy (perhaps 2+%), it will get stuck during the first few inches off the floor.
- If you try to lift a weight that is just too heavy (perhaps <1%), it will get stuck when the bar slows down mid-lift – in the sticking point.
But if the starting position is the biomechanially weakest part of a deadlift (tested on powerlifters), why do powerlifters have their sticking point much later in the lift, at a 57 degree thigh angle?
There might be several contributing factors, but the primary answer might well turn out to be energy expenditure. Short, forceful bursts of work depends primarily on free adenosine triphosphate (ATP) and creatine phosphate (PCr). ATP is the energy used for muscle contractions, and PCr is the quickest way of regenerating ATP in muscle. Your stores of ATP lasts only for ~2 seconds of work at maximum force and your strength starts to decline shortly after, even if your stores of PCr aids in maintaining it. Peak power output is reached after about ~3 seconds of maximal work, and after 6 seconds might be only 90% of that.12
A deadlift that is close to your max will always move slowly, but there is a disproportionate decrease in speed when you increase the load with the last few percentages from 97–98% of your max, to 100%. A deadlift that is truly 100% of your capacity (as in: if a fly lands on the bar during the lift you would fail) might very well take 7–8 seconds from start to finish, which means you will have burned almost all of your highest octane fuel by the time you are at your sticking point.
Now, given that you are strong enough to complete the lift, the lock-out part of a deadlift is actually pretty simple (not the same as easy). All you have to do is: extend your knees, hips and back, and keep your shoulder back for the lift to be considered completed.
If there is any need for a cue for this, it might be to simply drive your hips forward, kind of like a hip thrust. If you’re having troubles extending your spine in the top or having “soft knees” (not fully extended), a helpful visualization might be to imagine a chain attached to the top of your head, pulling you upwards.

Setting the Bar Down
You did it! You’ve locked out the bar and fully extended your body to an upright position. If you are competing, you will have to wait for the referee to give you a “Down!“-command, but otherwise it is time to set the bar down.
There are two things to cover here:
- How to set the bar down safely.
- Is there a strength advantage to setting the bar down slowly in your training?
The technique of setting down the bar is pretty straightforward – you simply backtrack your steps from the pull, even though we compress it slightly into two distinct phases:
- Hip hinge. Initiate the eccentric by pushing your butt back and leaning your torso forward. The knees bend, but not as fast as your hip. Lower the bar along your legs like this until you’ve cleared the knees.
- Knee bend. When the bar has cleared your knees, you are probably leaning as far forward as you’re going to get. At this point you take out the rest of the movement with your knees, and simply bend them until the bar touches the ground.
Greater Gains from a Controlled Eccentric?
The tricky part of a deadlift is the way up – the concentric phase. That is what you compete with in powerlifting, and the way down (the eccentric phase) is mostly a formality, where the only rule is to lower the bar with control and maintaining your grip on it until it rests on the floor.
Most powerlifters set the bar down pretty much as quickly as they can, both in training and competition. The are probably several reasons for this, among them being that eccentrics are uncomfortable and setting the bar down with a load bang looks and sounds pretty badass (hey, it does), but the main reason cited is specificity.
The principle of specificity has proven itself to reign supreme in the realm of all sports, and in deadlifts you compete in the concentric – not eccentric – phase. Besides, if you conserve your energy on the way down, won’t you be able to get in a few more good concentric reps before you’re worn out for the day?
That might be the case.
It might also be short-sighted.
Several studies has compared the concentric strength gains from training protocols where you either perform concentric reps only or concentric+eccentric (that is, normal training) reps, and found that concentric+eccentric training yields greater concentric strength gains – even if you perform twice as many concentric reps to volume match the two training protocols.13 14 15 16
What might this mean for your deadlift training? That even if you perform twice as many reps where you set the bar down quickly (without really braking it’s fall), you’re still not getting as good gains as if you were to really slow down the bar, and lower it under, say, at least two seconds.
Thus, a little bit more work and discomfort invested in your deadlift training in the shape of more prolonged eccentrics might pay good dividends. And I’ve personally found that it doesn’t really decrease the amount of good sets and reps I do in my training, so the excuse that “I save my energy to perform more concentric reps” not only seems wrong (in the sense that concentric+eccentric training yiels better strength gains even if you double the amount of reps in the concentric-only training), it’s also not what happens in real life.
A good guideline if you’d like to try accentuating the eccentric phase in deadlifts is to simply play into the hands of Planet Fitness and the like, and try to set the bar down without making a noise. The irony is beautiful.

How to Become Stronger in the Deadlift
So you’ve decided you want to become stronger in the deadlift. How do you go about it?
The weight you can lift in the deadlift is determined by the amount of force you can produce in your muscles (primarily the extensors of the hip, knee, and back) and transfer into the bar. To deadlift more weight, you must generate more force into the bar.
If you strip it down to the essentials, there are three different domains in which you can improve in order to accomplish this, and those are:
- Muscle & tendon. This is your hardware. A bigger muscle produces more force, and a stiffer tendon transfers that force into your bones more efficiently. Skeletal muscle mass is strongly correlated (~r=0.85) with deadlift performance.17 18
- Neuromuscular efficiency. This is your software. A stronger neural signal from your brain to your muscles will make them contract harder and faster. Neuromuscular efficiency means that only the muscles necessary for the task are contracting hard, while other muscles (such as the antagonists) are at a minimum activity.
- Technique. This is how you position yourself and the barbell in space and time. Pulling the bar off the floor in a more efficient manner lets you make the most out of your software and hardware.
In training for sports, the principle of specificity reigns supreme. It means that if you want to become better at deadlifting, then you’d better train the deadlift to some extent. It does not, however, apply equally to all three points in the list above. Rather, the requirement for specificity increases with each point above.
- To build bigger muscles, you simply have to train them in any reasonable way. Yes, strength gains can be quite specific in terms of vectors, but if you build bigger and stronger glutes using hip thrusts (for example), you will still have a bigger and stronger hip extensor when you go back to the deadlift.
- Tendons increase in stiffness from all heavy training, and the degree of specificity in terms of exercise choice is quite low here as well.
- Improvements in neuromuscular efficiency and especially technique require more specificity, and you will actually have to practice the lift in which you want to improve. Preferrably at pretty heavy loads.
This means that you can roughly divide your deadlift training into two distinct goals:
- Building bigger and stronger muscles.
- Specific deadlift practice.
Now, deadlifting in and of itself of course works all the relevant muscles for deadlifting, but limiting yourself to only deadlifts might limit the amount of productive muscle-building training that you could do, and thus hamper your strength gains – especially in the long term, where muscle mass plays a greater role.19

More conducive to long-term strength gains might be to keep a portion of specific deadlift practice in your training, and then add in hypertrophy work for the major muscles worked in the deadlift:
- Knee extensors: Quadriceps
- Hip extensors: Glutes, hamstrings, adductors
- Back extensors: Lower back
With this in mind, let’s see how this manifests itself in different training variables.
Training Volume for the Deadlift
The optimal training volume varies widely between individuals and is dependent on several factors, such as:
- Training status. The more accustomed you are to training, the more volume you can handle and likely need.
- Age. Young to middle-aged adults likely recover easier than elderly ones.
- Nutrition. Calories and protein are the currencies of adaption. The more you put in, the more you can spend.
- Recovery. Good sleep and low stress increase your ability to endure and adapt to the training.
The relationship between strength gains and training volume follows an inverted U-shape, where both too little and too much training leads to inferior gains.

Research into resistance training volume is carried out primarily on beginners or intermediate trainees. Generally, a low weekly set volume (less than 5 sets/week) is good, but a high volume (more than 10 sets/week) yields slightly better strength gains in this population.20
The upper limit of productive training volume is less researched, but might be in the vicinity of 15 sets to failure per week for new or intermediate lifters.21
Stopping your sets a few reps short of failure will likely increase the number of sets you can perform and recover properly from.22 Training to failure is not necessary for optimal strength gains, and might even be counter-productive, especially in the context of complex, multi-joint exercises like the deadlift.23
Below are some general volume recommendations in terms of working sets of deadlifts. They are based partly on the research litterature and partly on our own experience of training and powerlifting.
The recommendations pertain to working sets. That is sets that are challenging but are generally not performed to failure but leaving 1–2 reps in the tank.
- Low volume, 3–5 sets per week: This is a suitable volume for the beginner lifter that is simultaneously getting used to squatting maybe 1–2 times a week and thus is acclimatizing to a lot of new stress. It might also be suitable for the intermediate lifter, either tapering or taking a minimalistic approach to deadlifting while perhaps focusing on hypertrophy work for the deadlifting musculature.
- Medium volume, 6–13 sets per week: The goldilocks zone, and probably a nice target volume for most people in the intermediate stage. Recovery demands will be quite low if this is the only training you do for the lower body, but if you add in squats and deadlift accessory training, the total volume will place quite high demands on your recovery. This might be a suitable volume for an advanced lifter who is tapering.
- High volume, 14–20 sets per week: For the intermediate lifter who is stuck on a plateau and wants his or her deadlift to ascend to the next level, or for the advanced lifter. Recovery demands are high, especially if this is coupled with squat training and accessory work. Most will have to gradually increase their volume to this level over a long time, and some lifters might find it too much for them, and that medium volume works better.
Training Volume for Muscles Used in the Deadlift
For optimal deadlift gains, you will probably want to train the prime mover muscles more than you can do if you’d only use deadlifts. By varying your exercises, you can probably lower the risk of over-use injuries.
A recent meta-analysis found that 9+ sets per muscle per week resulted in hypertrophy gains of 8.0% over a period of 12 weeks, compared with 5.9% for less than 9 sets per week.24 However, most studies in the meta-analysis (12 out of 14) were conducted on previously untrained participants, and research on well-trained lifters is lacking. In most studies the sets were also performed to failure; stopping the sets short of failure likely increases the volume you can do and recover from.
If your deadlift volume is along the lines of medium (6–13 sets/week) or even high volume (14–20 sets/week), then you are already training all the prime movers reasonably well. Add in squat training at least once a week, and you have a solid foundation of training for all the prime mover muscles.
However, both squats and deadlifts can be quite strenuous, and there might be room for some “easier” exercises for a small additional increase in gains. Read more about this in the section “Assistance Exercises”.
Training Frequency for the Deadlift
In meta-analyses conducted on mostly (~90%) untrained populations, resistance training frequency doesn’t seem to impact gains in strength or hypertrophy much as long as the total training volume is the same.25 26 27
However, the total training volume that you can positively adapt to is likely higher with a higher training frequency, as you’ll hit the maximum number of sets that can be productively performed in a session, before you’ll hit the maximum number of sets that can be productively performed in a whole week.
Therefore, training frequency might be an important mediator for training volume. Do you want to train a lot? Well, sooner or later you’ll have to distribute the training on more days, before your current workouts swell beyond the scope of what is productive to do in one session.
A rough limit on the number of work sets of deadlifts in a single session might be somewhere in the neighbourhood of 10 sets for an experienced lifter, but you might want to split the training volume to two sessions earlier than that, perhaps at 8 work sets.
Here’s how you might distribute the aforementioned volume recommendations on different training frequencies:
- Low volume, 3–5 sets per week: 1 session per week.
- Medium volume, 6–13 sets per week: 1–2 sessions per week.
- High volume, 14–20 sets per week: 2–3 sessions per week.
The deadlift is widely considered to require longer rest between sessions compared to the squat or bench press. This, however, is not reflected in studies examining fatigue after strenuous training sessions for the three lifts.28 29
A survey of 104 mid-level Swedish powerlifters revealed that they, on average, train deadlifts 1.6 ± 0.8 times per week, but train squats 2.2 ± 1.0 times per week.30
About 1–2 deadlift sessions per week is not a bad starting point for someone who also trains squats or similar lower-body movements. Most lifters can probably do one hard deadlift session per week, while two sessions per week might require most lifters to dial down the intensity a bit. A classic recommendations for adapting to a larger workload that you might use for the deadlift is this:
- First increase the frequency. Go from one deadlift session to two, more or less by splitting your current training volume in two.
- Then increase the volume. Slowly ramp up the volume by adding easy sets, so that you are well on the safe side of doing too much, too soon.
- Finally increase the intensity (load). When you are accustomed to two deadlift sessions per week, you might start to increase the intensity of load you’re using.
A strategy we like, and that we employ in our popular deadlift program Deadlift Disco (which you can find in our app), is to have two deadlift sessions in a week:
- One session (Monday) with regular deadlifts.
- Another session (Friday) with a deadlift variant – in the case of Deadlift Disco, we use paused deadlifts.
Typically, the second session is a bit easier than the regular deadlift session and can consist of a variation that aids your competition style. We believe paused deadlifts are a generally helpful variation, but other options might be deficit deadlifts, trap bar deadlifts, or rack pulls.
Load & Reps for the Deadlift
Your strength can improve from training with both high and low loads, but when you compare them head to head, lifting heavy weights is slightly more effective if you want to get better at, well, lifting heavy weights.
A meta-analysis of 14 studies with mostly untrained participants found that training with more than 60% of 1RM led to significantly higher strength gains than training with 60% or less.31
There are several rep and loading strategies that work, as long as you heed the principle of specificity (i.e. lifting heavy every once in a while) and progressive overload (e.g. adding weight or reps).
Without getting into periodization practices, here are three basic templates for structuring your workouts in the context of the two principles mentioned above. Try to increase weights/reps over time.
- Pyramid training. Increase the weights in a pyramid fashion during your workout. E.g., go from 6–10 reps at 60% of 1RM, up to 1+ reps at 90%, and back down to 60% again. That way, you’ll get some practice at heavier weights while still getting a good amount of volume in.
- Slug away at 80%. The range of about 75–85% of 1RM is the powerlifters bread and butter. It’s heavy enough to be specific training for max attempts, but not so heavy that it burns you out. It’s typically possible to accumulate a large, effective volume at this intensity. Something like 6–10 sets x 2–3 reps might be appropriate.
- Heavy plus assistance lifts. Work up to one max effort set at 85–90% of 1RM, maybe follow up with 1–2 lighter back-off sets, and then fill in with volume from your favorite assistance exercises for legs, glutes, and back.
Assistance Exercises for the Deadlift
Assistance exercises can generally be divided in two groups, based on their desired training effect:
- Hypertrophy. Exercises that strengthen and grow the muscles used in the lift.
- Strength/Technique. Exercises that strengthen the movement, or improve the performance or technique of the lift.
Note: one exercise might fit in both categories.
Let’s explore the two categories and give some examples of appropriate exercises.
Assistance Exercises for Muscles Used in the Deadlift
The primary movers in the deadlift are the knee extensors (quadriceps), hip extensors (glutes, hamstrings, adductors), and back extensors (mostly your lower back), so that is the muscles you should be most concerned about strengthening and growing.
The options for hypertrophy exercises are many and more a matter of personal preference than anything else. If you can do an exercise with a decent range of motion, get a nice muscle contact, and it doesn’t hurt – then you can probably use it to build muscle.
Here is a sample list of exercises that you might use to supplement your training for the muscles involved in the deadlift. If you are hitting squats and deadlifts hard, you might only want to pick 1–2 of the exercises below and do 2–3 sets x 1–2 workouts per week. If you deadlift with a low volume (relative to your training level), you can increase the volume of assistance exercises.
- Squat (if you’re not already doing them) (knee, hip and back extensors)
- Bulgarian split squat (knee and hip extensors)
- Hip thrust (hip extensors)
- Kettlebell swing (hip and back extensors)
- Hyperextension (hip and back extensors)
- Good morning (hip and back extensors)
- Romanian deadlift (hip and back extensors)
- Barbell row (upper back and isometric training for back and hip extensors)
- Farmers walk (core, grip, trapezius, and stability training for hips)
Deadlift Variations to Strengthen or Improve Deadlift Technique
The best exercise to improve your deadlift technique and performance is the deadlift. But, that doesn’t mean that there are no more tools in the toolbox.
Here are some of the most common deadlift variations that you might use to strengthen your deadlift or improve your technique. They are generally more taxing than the hypertrophy exercises listed earlier and cut in more into your other deadlift volume. Working sets of the exercises listed below should probably be traded in for your regular sets of deadlifts if you’re already training at a high volume rather than piled on top of it.
- Pause deadlifts. Can be used to improve overall technique and strength around the position that you pause in. We generally recommend pausing as close to the floor as possible (just an inch or so above), and for a count of three.
- Deficit deadlifts. Can be used to challenge and strengthen the start in the deadlift, and also might bring about more training for your legs. Do these by standing on a weight plate or some sturdy block, around 1–4 inches high, so that you’ll have to reach down further to grab and lift the bar.
- Rack pulls. Useful for getting used to heavier weights in your hands, and overloading the later part of a deadlift. Choose rack height at your own discretion, but a common height is to begin with the bar just below your knees.
- Trap bar deadlifts. Distributes the work more evenly between hip and knee extensors, and unloads the back a bit. Can be useful for more balanced development of the lower body, and is a back-friendly substitute.
If you identify a need for one of the exercises above, or simply want to introduce more variation in your training, you could try substituting about 30–50% of your deadlifts with one of them. Or, if you are training deadlifts two or more times a week, you might switch out one of the days completely to a variant. In some training blocks when you are far from competition, you might not even have regular deadlifts in your routine at all.
Deadlift Training Programs
That’s a lot of information about deadlifting, but how do you convert that into a deadlift training program?
Below follows a few different sample programs for beginner, intermediate, and advanced lifter respectively.
A loose definition of those three might be as follows:
- Beginner: Someone who is new to deadlifting. Can expect to get stronger from workout to workout.
- Intermediate: Someone who has been training deadlifts for about six months (give or take a few months). Can expect to get stronger from week to week.
- Advanced: Someone who has been deadlifting for a year or more. Can expect to get stronger from month to month, or from training block to training block.
You can read more about these definitions in: How to Get Stronger, Part 3: The Advanced.
What separates a beginners training from an advanced lifters?
Primarily two things:
- Volume: To continue bringing about new adaptations from the training (i.e., getting bigger and stronger), you need to increase the stimulus. You will obviously do this in one part by increasing the weights you’re training with, but the other part is by increasing the total number of sets and reps you do. Throughout the course of your career, your training volume will need to increase.
- Specificity: The earlier in your training career you are, the more general you can afford to be and still make gains. The more advanced you are, the more specific your training will have to be. For the deadlifter striving to increase his 1RM, this means that you will increase the amount of training you do at a high intensity (high % of your 1RM) throughout your lifting career.
Lets have a look at the sample programs.
Beginner Deadlift Training Program: 1–2x/week
A beginner’s deadlift program can be simple. It can consist of one single workout that you repeat once or twice a week.
Begin your training program at an easy weight, where you are in control of the technique.
Beginner Deadlift Workout:
- Deadlift: 3 sets x 5 reps
If you manage to do all 3 sets x 5 reps, increase the weight by 5–10 pounds (2.5–5 kg) for the next workout. If you can’t do 3 set x 5 reps, keep training with the same weight every workout until you successfully get all reps.
Our beginner barbell program is a great program to start with. In that program, you will alternate between squats and deadlifts each workout, both of which complement each other beautifully.
When you can no longer increase the weight or even by a single rep between workouts, you are ready for intermediate phase training.
Intermediate Deadlift Training Program: 2x/week
Instead of aiming to make noticeable strength gains every workout, the intermediate lifter will strive to make progress from week to week. Therefore, the lifter will only really push their limit once every week.
The intermediate lifter will likely need slightly more training volume than the beginner lifter, and will also need to train closer to his or her 1RM for the best strength gains.
Increased muscle mass will begin to play a greater role for long-term strength gains, and therefore some hypertrophy-focused training is added.
Here’s an example of an intermediate deadlift program that consists of one heavy and one light workout per week. The point is to try and increase the weight you are lifting every heavy workout, while the light workouts add training frequency and volume.
Intermediate Deadlift Workout A (Heavy):
- Deadlift: 3 sets x 3 reps x 80% of 1RM – once you can complete all reps, increase the weight by 5 lbs/2.5 kg for the next workout.
- Romanian Deadlift: 3 sets x 8 reps
- Barbell Row: 3 sets x 10 reps
Intermediate Workout B (Light):
- Deadlift: 5 sets x 5 reps – with 80% of the weight used in workout A.
- Front Squat: 3 sets x 5 reps
- Barbell Row: 3 sets x 10 reps
Advanced Deadlift Training Program: 2x/week
The advanced lifter acknowledges that the sweet newbie gains have come and gone, and you will likely only see noticeable strength gains every 1–2 months on average – if you’re even that lucky. Deadlift Disco, the deadlift training program in our app, is 6 weeks long, which we’ve found to be something of a sweet spot for many lifters.
It is harder to give samples of advanced training programs since as lifters progress in their training, they become less homogenous, and the importance of individualization increases. Therefore, we will describe how we’ve designed the progression in Deadlift Disco so that you can use that information to plan your own training. Or, if you’d prefer: download our app, register for premium, and try the program yourself.
Deadlift Disco is designed so that you can train it continuously for several cycles in a row. You deadlift twice a week: one heavier session with regular deadlifts progressing mainly in intensity (% of 1RM) and one lighter session with pause deadlifts.
The breakdown of the programs progression is this:
- The volume (in terms of sets of deadlifts) increases over the first few weeks and peaks in weeks 3 and 4, following an inverted U-shape. The final week, containing the max attempt, functions as a taper and also something of a deload before the next cycle.
- The peak % of 1RM climbs from 80% of 1RM in week one, to 102.5% (your new max attempt) in week 6.
- The average % of 1RM increases gradually over the course of the six weeks, from 69% of 1RM in the first few weeks, reaching 79% at most in week 6.
Here’s a visual representation:

The gist of the program is this:
- You start off in a somewhat comfortable place, and then increase the volume and your training weights gradually from there, trying to push your limits just enough to stimulate new gains.
- You finish the training cycle with a taper and a max attempt in week 6.
- If the program seemed productive to you, and you believe you will benefit from another cycle, increase your submitted 1RM and go through another cycle of training.
Useful Equipment for Deadlifting
Let’s have a look at some of the most useful and important equipment considerations for deadlifting.
We will be covering:
- Shoes
- Chalk
- Belt
- Lifting straps
Shoes for Deadlifting
There are three main things to consider when choosing shoes for deadlifting:
- Stability. You’ll want a firm or even hard sole, to keep your foot stable while lifting. Avoid soft and wobbly jogging shoes, as their instability will hurt your performance and increase injury risk. For optimal force transfer into the ground (which you need in order to lift the bar), you need good ground contact.
- Height. Remember: the beginning of the deadlift is the hardest part, and the more bent over you are, the weaker you are. The height of the soles will affect how much you have to bend forward, so if your goal is to lift as much weight as possible, it is advantageous to use shoes with thin soles.
- Friction. This is mostly an issue for those of you who pull sumo – with a conventional foot position (feet about under your hips), you’re not very dependent on friction. For sumo lifters however, that is what will keep your feet from slipping away.
It is not a coincidence that many lifters choose to train in their socks or even barefoot, if the gym allows them. It puts them close to the ground, and there is no instability from a soft sole. In competition, the same lifters might use deadlift slippers. Personally, I like deadlifting in minimalistic shoes (sometimes called by the idiotic name “barefoot shoes”), and currently use a pair Stealth II from Vivobarefoot. The sole is only 3 mm thick and has great friction.
Chalk
Chalk is the name of the white stuff you put in your hands (and sometimes on your back when you’re squatting of benching) to dry them up and inrease the friction, thereby giving you a better grip. Actually, real chalk isn’t in use any more, as it has been replaced by (most commonly) magnesium carbonate. The name chalk, however, remains.
It’s effect on your grip is immense, and once you’re past the beginner phase, you can’t really train deadlifts properly without either chalk or lifting straps.
And, if you’ve never tried chalk, your grip might be holding you back without you even knowing it.
I clearly remember when I first got into deadlifting myself. My training weights were about 120 kg for sets of five, when I bought my first block of chalk. Next deadlift workout, with the aid of chalk, I could suddenly add 20 kg to that, and pull 140 kg for fives. Needless to say, such a performance improvement will lead to a vastly better training effect for all the other muscles used in the deadlift. Your grip will still be worked sufficiently from the increased weight, and all other training that you do.
Chalk is probably as close to a must-have for deadlifts as it gets.
Belt for Deadlifting
A lifting belt is typically between 2 to 4 inches wide, and aids you by increasing the intra-abdominal pressure.32 33 This stiffens your core, and helps most people lift about 5–10% more weight – at least after they have been accustomed to wearing a belt, it can be quite uncomfortable in the beginning.
If using a belt enables you to lift more weight, than that will most likely be positive for the training effect in your legs, hips, trapezius and grip. They get to work against a heavier weight, while not getting any direct help from the belt.
But what about your core? A common argument is that a belt will weaken your core muscles by doing the work for them. EMG-studies does not support this argument, as they either find small or no differences in core muscle activation.34 35 36 37
The belt probably changes the muscle activation pattern in some ways, however, and it might be a good idea to train both with and without a belt, so that you practice both activation patterns.
We recommend that you use a belt if you compete in powerlifting or a similar sport where you can use a belt in competition (given that it actually improves your performance, of course). You might also want to use a belt if you are a bodybuilder or train for general strength and hypertrophy, as the belt will likely give your muscles a better training stimulus.
If you don’t train to compete in powerlifting or other sports where deadlifts with a belt is a common event, then it probably doesn’t matter too much if you use a belt or not in your training. On the one hand the belt might enable your legs and hips a better training stimulus, but on the other hand you might want to practice bracing your core without a belt if you’re going to use your strength without a belt. The answer might lie somewhere in between, and you might be best off using a belt periodically, or only for some of your sets.
Lifting Straps in the Deadlift
Lifting straps aids your grip by securing your hands to the bar. This comes with both pros and cons, and you can read more about them in the grip section.
While you probably shouldn’t use lifting straps all the time, they can still be a valuable tool in your gym bag.
Frequently Asked Questions
Here are some answers to frequently asked questions about deadlifting. Can’t find the answer to your question? Leave a comment, and we’ll try to answer!
Are Deadlifts Dangerous?
“The dose makes the poison”.
Deadlifts are not inherently dangerous – in fact, they have even been used to treat back pain successfully in patients with back pain, like in this study.
Deadlifts strengthen and stress your body, and the most important things you can do to ensure the safety of deadlifting is to:
- Learn proper deadlift form. As laid out earlier in this guide.
- Gradually increase load and training volume. To give your body time to adapt.
If you do these two things, you are likely to get the reward that everyone covets from deadlifting: a healthy, strong and resilient back.
Will Deadlifts Make Your Waist Bigger?
Many people use strength training not only to perform and feel better about themselves, but also to look better. One coveted feature of appearance is a slim waist, maybe coupled with broad shoulders and powerful glutes. How does deadlifts fit into this? And will they make your waist bigger?
Let’s look at the muscles mainly worked by deadlifts:
- Lower back (erector spinae)
- Glutes
- Quads
- Hamstrings
- Adductors
- Trapezius
- Grip muscles
None of these muscles will make your waist bigger. On the contrary, the development of these muscles will enhance your athletic appearance, and make you look better both with and without clothes on.
It is first when we look at the stabilizing core muscles used in the deadlifts that we find the source of these worries. These muscles are mainly your transversus abdominis and your obliques.
The transversus abdominis and obliques (internal and external) are three of your abdominal muscles and run between your pelvis, ribs, and the fascia of your back.

Now, the problem with this line of thinking is two-fold:
- Deadlifts are not that good of an exercise to train these muscles to begin with. They are worked to some extent from it, but there are better options.
- If these muscles are well developed, they will contribute to your appearance and look good!
I’ve yet to come across a single deadlifter that dieted down to low body fat and was displeased by how their abs look. Rather they find that their abs have developed quite nicely.
Do not avoid deadlifts on the premise that they make your waist big. It is an unwarranted concern. Rather, deadlifts can be a key exercise in your training regimen to build a better-looking body.
Fat makes your waist big, not deadlifts.
Should You Deadlift With a Dead Start or “Bounce”?
When you’re putting down the bar to the floor after a deadlift, and you’re going to perform multiple reps, you have a choice:
- Dead start. You can either set the bar down until it is completely still, and start your next rep from a dead start.
- Bounce / Touch and Go. Or you can immediately reverse the movement into another lifts concentric phase. This can be more or less exaggerated, but however you do it, you will still make some use of the kinetic energy of the “bounce”, no matter how small it is.
First off: definitions. There aint no two ways about the fact that a true deadlift is performed from a dead start. That’s why it’s called a dead lift.
However, that doesn’t mean that you’re not free to train however you see fit. Let’s look at the effects of the two styles:
Deadlifting with a dead start …
- won’t let you complete as many reps in a set, or with as heavy a weight.
- resembles a single lift the most.
- gives you more practice on the hardest part of a deadlift.
- improves your opportunity to pull each rep the same way.
Deadlifting with touch and go …
- will let you complete more reps in a set, or use a heavier weight. This happens due to 1) kinetic energy from the bounce, and 2) the stretch shortening cycle in the muscles (e.g. kinetic energy stored in tendons).
- increases the metabolic stress in your muscles, as they will be constantly contracted and thus hindering the blood flow.
- partially eliminates the hardest part of a deadlift.
- makes it more difficult to pull each rep the same way.
Our general recommendation is that you always deadlift with a dead start, but let’s break it down a bit based on the two training goals strength and hypertrophy.
If you are deadlifting to increase your deadlift 1RM then your should most likely do most if not all of your deadlift training with dead starts. That will give you the best practice of the hardest part of the lift, and your muscles fibres will have to do all the work to get the bar moving. If you reverse the lift immediately like with touch and go, the kinetic energy stored in your tendons will take away some of the work that your muscles would otherwise have to do.
If you are deadlifting to build bigger muscles then it probably matters a whole lot less which style you use. The possibly higher metabolic stress of constantly contracted muscles might be a boon, but on the other hand: nothing will hurt your gains more than an injury, one of which you probably take a greater risk of sustaining with the more uncontrolled technique of touch and go.
So, therefore our general recommendation is: always deadlift with a dead start.
Will Deadlifting With a Mixed Grip Give You an Asymmetrical Back?
A mixed deadlift grip means that you grab the bar with one hand pronated (palm facing you) and one hand supinated (palm facing away).
The question is: will the supinated hand lead to differences further up in the chain? For example by rotating your upper arm outwards, and maybe even rotating your scapula?
Different lifters have different mobility in their elbow joint, and some might be able to supinate their hand without rotating their upper arm. We feel that most lifters however will rotate their upper arm to some extent, which will translate to slightly different muscle lengths in your upper back. The question is, does it make any real difference?
The muscles in your upper back are not among the muscles primarily worked in the deadlift, meaning that whatever stimulus they receive is pretty low compared to how the glutes, hamstrings and lower back is worked by deadlifting. That is one case against asymmetries developing from deadlifting with a mixed grip.
Another case against it is dilution. Likely, you do more back training than only deadlifts (and if don’t then maybe you should). If you do rows or pull-ups which directly train your upper back, and where your arm position is symmetrical, that likely has such a large impact on your upper back development that the influence of any asymmetric stimuli from deadlifts is negligible.
A compromise could be that you use mixed grip in about half of your deadlift training, and lifting straps (with a symmetrical, overhand grip) in the other half. Another compromise would be to switch up your mixed grip between sets, but I’ve personally never really liked that.
Even if you would do 100% of your deadlifts with the same mixed grip, I still think you’ll be fine.
Why Do I Get Back Pain From Deadlifts?
Back pain can have a lot of different sources, but if you get them during or after deadlifts, then there are two possibilites that are more likely than others:
- You are lifting with a technique that gives you pain.
- You are lifting more than your back can take (either in terms of weight on the bar, or total training volume).
For the technique issue: review the technique outlined above. Specifically, consider your back position and your bracing. Do you round your back when deadlifting? Could you try to lift with a more neutral back, and does it still hurt then? Do you brace your core properly, and could you experiment with different bracing patterns? Could you possibly use your legs more in the lift, and your back less? Those are some technical considerations you might experiment with, to see if anything helps. Get help from a friend or trainer that knows how to deadlift, or film yourself with your phone during sets to review your deadlift technique.
Of course, no technique in the world will help you if you train far more than your back is ready for. You must always gradually adapt to higher training loads, and swift increases in training are a common source of injury. Try decreasing your deadlift volume to 30–50% for a few weeks, and see if it helps. If excessive training was the culprit, that deload might be enough to allow your back to recover.
That’s it! You’ve reached the end of our deadlift guide.
If you’d like to read more articles of this kind on anything related to strength training, be sure to sign up for our free newsletter below, to be notified of new posts!
If you’d like to try one of our popular programs such as Deadlift Disco, you can find them in our app StrengthLog (available on both iOS and Android).
>> Return to exercise directory.
References
- Med Sci Sports Exerc. 2000 Jul;32(7):1265-75. A three-dimensional biomechanical analysis of sumo and conventional style deadlifts.
- Med Sci Sports Exerc. 2002 Apr;34(4):682-8. An electromyographic analysis of sumo and conventional style deadlifts.
- Med Sci Sports Exerc. 1991 Oct;23(10):1179-86. Lumbar spine loads during the lifting of extremely heavy weights.
- J Sports Sci Med. 2019 Aug 1;18(3):448-453. eCollection 2019 Sep. Anthropometrical Determinants of Deadlift Variant Performance.
- Journal of Trainology. 2012 Nov;1(2):32-35. Isometric Strength of Powerlifters in Key Positions of the Conventional Deadlift.
- Spine (Phila Pa 1976). 1992 Mar;17(3):327-34. Erector spinae activation and movement dynamics about the lumbar spine in lordotic and kyphotic squat-lifting.
- Sci Rep. 2017 Apr 19;7:45975. doi: 10.1038/srep45975. Running exercise strengthens the intervertebral disc.
- Eur Spine J. 2011 Nov; 20(11): 1796–1812. The effects of dynamic loading on the intervertebral disc.
- Spine (Phila Pa 1976). 2010 Oct 1;35(21):1897-908. doi: 10.1097/BRS.0b013e3181d9b69e. ISSLS prize winner: how loading rate influences disc failure mechanics: a microstructural assessment of internal disruption.
- Spine (Phila Pa 1976). 2014 Jun 1;39(13):1018-28. doi: 10.1097/BRS.0000000000000262. How healthy discs herniate: a biomechanical and microstructural study investigating the combined effects of compression rate and flexion.
- J Strength Cond Res. 2009 Dec;23(9):2574-80. Kinematic analysis of the powerlifting style squat and the conventional deadlift during competition: is there a cross-over effect between lifts?
- Maughan & Gleeson, The Biochemical Basis of Sports Performance, 2nd edition. 2010.
- Acta Physiol Scand. 1990 Sep;140(1):31-9. Effects of eccentric and concentric muscle actions in resistance training.
- 2015 ASCA International Conference on Applied Strength and Conditioning. The effects of concentric/eccentric training versus concentric only training on peak power and functional muscle performance.
- J Physiol. 2000 Apr 1; 524(Pt 1): 293–304. Changes in muscle strength, muscle fibre size and myofibrillar gene expression after immobilization and retraining in humans.
- Aviat Space Environ Med. 2003 Apr;74(4):342-7. Strength gains following different combined concentric and eccentric exercise regimens.
- J Sports Med Phys Fitness. 2013 Aug;53(4):409-14. Relationship between lifting performance and skeletal muscle mass in elite powerlifters.
- Eur J Appl Physiol. 2002 Feb;86(4):327-36. The role of FFM accumulation and skeletal muscle architecture in powerlifting performance.
- Am J Phys Med. 1979 Jun;58(3):115-30. Neural factors versus hypertrophy in the time course of muscle strength gain.
- Sports Med. 2017 Dec;47(12):2585-2601. doi: 10.1007/s40279-017-0762-7. The Effect of Weekly Set Volume on Strength Gain: A Meta-Analysis.
- Current Opinion in Physiology. Available online 17 April 2019. Training for Strength and Hypertrophy: An Evidence-based Approach.
- Eur J Appl Physiol. 2017 Dec;117(12):2387-2399. doi: 10.1007/s00421-017-3725-7. Epub 2017 Sep 30. Time course of recovery following resistance training leading or not to failure.
- Sports Med. 2016 Apr;46(4):487-502. doi: 10.1007/s40279-015-0451-3. Effect of Training Leading to Repetition Failure on Muscular Strength: A Systematic Review and Meta-Analysis.
- J Sports Sci. 2017 Jun;35(11):1073-1082. doi: 10.1080/02640414.2016.1210197. Epub 2016 Jul 19. Dose-response relationship between weekly resistance training volume and increases in muscle mass: A systematic review and meta-analysis.
- Sports Med. 2018 May;48(5):1207-1220. doi: 10.1007/s40279-018-0872-x. Effect of Resistance Training Frequency on Gains in Muscular Strength: A Systematic Review and Meta-Analysis.
- Sports Med. 2016 Nov;46(11):1689-1697. doi: 10.1007/s40279-016-0543-8. Effects of Resistance Training Frequency on Measures of Muscle Hypertrophy: A Systematic Review and Meta-Analysis.
- J Sci Med Sport. 2019 Mar;22(3):361-370. doi: 10.1016/j.jsams.2018.09.223. Epub 2018 Sep 13. Resistance training frequency and skeletal muscle hypertrophy: A review of available evidence.
- Appl Physiol Nutr Metab. 2019 Feb 19. doi: 10.1139/apnm-2019-0004. Time Course of Recovery is Similar for the Back Squat, Bench Press, and Deadlift in Well-Trained Males.
- J Strength Cond Res. 2017 Jul 12. doi: 10.1519/JSC.0000000000002140. Acute neuromuscular and endocrine responses to two different compound exercises: squat versus deadlift.
- Orthop J Sports Med. 2018 May; 6(5): 2325967118771016. Prevalence and Consequences of Injuries in Powerlifting: A Cross-sectional Study.
- J Strength Cond Res. 2017 Dec;31(12):3508-3523. doi: 10.1519/JSC.0000000000002200. Strength and Hypertrophy Adaptations Between Low- vs. High-Load Resistance Training: A Systematic Review and Meta-analysis.
- Med Sci Sports Exerc. 1989 Apr;21(2):186-90. Effects of a belt on intra-abdominal pressure during weight lifting.
- Med Sci Sports Exerc. 1990 Feb;22(1):117-26. The effectiveness of weight-belts during the squat exercise.
- Med Sci Sports Exerc. 2002 Apr;34(4):682-8. An electromyographic analysis of sumo and conventional style deadlifts.
- J Strength Cond Res. 1999 Nov. The Use of Lumbar-Supporting Weight Belts While Performing Squats: Erector Spinae Electromyographic Activity.
- J Strength Cond Res. 2001 May;15(2):235-40. The effects of a weight belt on trunk and leg muscle activity and joint kinematics during the squat exercise.
- Clin Biomech (Bristol, Avon). 1999 Feb;14(2):79-87. Effects of abdominal belts on intra-abdominal pressure, intra-muscular pressure in the erector spinae muscles and myoelectrical activities of trunk muscles.