
Whether you’re a total beginner or looking to take your bodyweight training to the next level, this guide has everything you need: fundamentals, progressions, and a calisthenics workout plan (make that two plans!) that proves gravity is the only weight you’ll ever need.
No gym? No problem. No equipment? Who needs it? Calisthenics is about using the greatest fitness machine ever built—your own body. Let’s get to it!
Click here to open the Beginner Calisthenics Workout Plan in StrengthLog.
Click here to open the Intermediate Calisthenics Workout Plan in StrengthLog
Table of Contents
What is Calisthenics?
Calisthenics is basically using your body weight to build strength, flexibility, and coordination—without needing a gym full of machines or a ton of heavy bars and plates. Calisthenics aficionados consider it the ultimate way to get strong, lean, and agile using just your body and gravity.
A Very Brief History of Calisthenics
Calisthenics has ancient origins. The term itself comes from two Greek words: kallos (meaning “beauty”) and sthenos (meaning “strength”), reflecting the ideal balance between physical grace and power through bodyweight exercises.1
The Spartans and other Greek city-states knew the value of physical fitness and bodyweight drills to prepare for warfare and sports competitions, and the Roman Empire borrowed and adapted many of their training practices.2 In relatively modern times—early 19th-century Germany—outdoor gymnastics clubs promoted both individual fitness and national pride, and calisthenics have been on a constant rise in popularity ever since.
By the late 19th and early 20th centuries, calisthenics was common in military drills, and in many countries, physical education classes in schools included group calisthenics.3
In the 21st century, calisthenics saw a huge surge in popularity as street workout communities turned their local public park and playgrounds into training grounds, and today, millions use calisthenics as their main form of training, from CrossFit-style to calisthenics competitions and social media content.
Benefits of Calisthenics
More and more people are falling in love with calisthenics. And the best parts?
- No equipment needed—perhaps the biggest benefit of all. You can add gadgets like a pull-up bar, parallettes, and resistance bands to make your training even more versatile, and you can use weighted vests and other forms of resistance, but your body and nothing else can take you very far.
- Improves strength, endurance, flexibility, and coordination—kind of a jack of all trades, calisthenics improves almost all parts of physical fitness.
- Can be done anywhere—park, home, prison cell (hopefully not)—because you’re not beholden to a gym, calisthenics gives you the ultimate freedom in your workout plan.
Calisthenics gives you functional strength, meaning you’re training your body to move better in real life—not just to look good in a mirror (though it will make that happen, too). It’s also scalable: as a beginner, you can start with easier progressions like basic push-ups and squats, while advanced athletes can work toward gravity-defying exercises like the muscle-up, planche, or front lever.
In short, calisthenics turns your body into your gym.
Calisthenics Training
Let’s talk calisthenics training. One of the biggest challenges with only using your body weight as resistance is that it is kind of fixed. You can’t slap a pair of plates on a bar to increase the load, so you have to get more creative to be able to practice progressive overload, the number one factor for strength and muscle gains over time.

Progressing Calisthenics
Progressive overload is one of the fundamental requirements for improving in any sport or physical activity. As you get stronger, your body adapts, and those 12 push-ups that had you struggling when you were starting out now don’t feel very challenging or build any more muscle or strength.
Calisthenics can be progressive, just like weightlifting. You don’t need barbells and weight plates to keep getting stronger if you don’t want to—you just need to get smarter with your training.
Here’s how you keep making gains without touching a single weight.
Increase Reps & Sets
If 10 push-ups feel easy, do 15. Then 20. Then 30. Your muscles don’t care if the resistance comes from iron or gravity—as long as you challenge them, they grow, at least up to around 30 reps. At some point, though, you start to improve muscle endurance rather than boost strength and hypertrophy by doing more and more reps.
Change the Leverage
Your body is the weight—but you can manipulate the angles to make almost any exercise more challenging. Once you can easily do the number of bodyweight squats your calisthenics workout plan calls for, you’re not stuck with only the option of doing more and more.
- Push-ups → Diamond Push-ups → Archer Push-ups → One-arm Push-ups.
- Squats → Bulgarian Split Squats → Pistol Squats → Shrimp Squats.
- Planks → Elbow Lever → Planche.
Slow Down (Eccentric & Isometric Work)
The eccentric (lowering) phase of a repetition is often considered the most productive part.4 Slow it down to make the exercise more challenging and generate more force (and possibly more gains).
Another trick is to pause at the hardest part (like holding a squat at the bottom) to increase time under tension.
Add Explosiveness
Explosive movements under load (your body weight) are fantastic for power and speed training. Do clap push-ups, jump squats, and explosive pull-ups → recruit more fast-twitch muscle fibers = strength gains.
Ever tried super-slow and super-fast push-ups in one workout? Give it a go and feel your muscles burn.
Increase Volume & Frequency
Another road to progressive overload is simply to train more. Instead of training 3x a week, bump it to 4–5 days. Training volume is one of the primary drivers of strength and hypertrophy, but remember that it becomes increasingly important to pay attention to recovery and nutrition when you up your training dose.
Greasing the groove (mini sets throughout the day) for skill-based exercises like pull-ups or handstands can also be a good idea to get more training without setting aside time for a complete workout.
Add External Resistance
Calisthenics purists who believe that gravity alone should be your resistance might scoff at adding weights. And sure, part of the appeal of calisthenics is that you don’t need a gym, just your body and a playground. Throwing on a weighted vest or strapping plates to your dips makes it feel… well, like weight training.
However, adding resistance can be a tool, not a crutch. If you’re going for maximum hypertrophy and strength, why not mix both? It will help you reach that goal.
Adding a backpack, weighted vest, or resistance bands for extra overload turns bodyweight training into something as progressive as lifting weights without the actual dumbbells and barbells.
***
In short, your progress never stops if you know how to challenge yourself. Your body adapts to stimulus, not just weight. And you can give it that stimulus without even looking at an exercise machine or loaded barbell.
If you do want to try your hand at weighted calisthenics, here’s how.
Weighted Calisthenics
You should consider adding weight to your calisthenics when:
- Your body weight feels too easy. If you can do high reps (12–15+) with perfect form and still feel like you have gas left in the tank, it’s time to up the challenge.
- You’ve mastered progressive variations. If you’ve already progressed through harder bodyweight versions (like going from push-ups to archer push-ups to one-arm push-ups), adding weight is a great next step.
- Your strength goals require it. If you’re aiming for maximum strength, you’ll eventually reach the point where your body weight is not enough, no matter how you manipulate variables like leverage and exercise variants. That’s when loading your movements will help you push your gains to the next level.
- You want more muscle growth. Again, progressive overload is key to hypertrophy. Weighted calisthenics can give you the effect of lifting weights while keeping the functional benefits. Sure, some hardcore calisthenics fans will claim that your body weight is all you need (and the gym bros will do the same on their side), but the truth lies somewhere in the middle, and why not combine the best of both worlds?
How to Add Weight to Calisthenics
Weighted Vest
Getting a weighted vest is one of the easiest ways to increase the load in many calisthenics exercises and is an excellent choice if you decide to spend money on extra equipment. It evenly distributes the weight across your torso and will make dips, pull-ups, push-ups, squats, and lunges more challenging without you having to find suitably heavy objects to carry in your hands or hang from your waist.
Dip Belt
A dip belt is perfect for adding plates to dips and pull-ups and adds resistance while keeping those movement patterns feeling natural. However, it feels awkward to use while squatting or doing calisthenics exercises that require movements besides pushing or pulling yourself straight up and down. You also have to get something to hang from it.
Backpack with Weights
A regular backpack loaded with books, water bottles, or plates is budget-friendly, but make sure the weight is evenly distributed.
Holding a Dumbbell or Weight Plate
Works well for Bulgarian split squats, goblet squats, and even push-ups (place a plate on your back). However, you need both hands to support your body weight for many other calisthenics exercises.
Resistance Bands
A resistance band is not “adding weight” in the strictest sense, but adding resistance to make the movement harder. It works well for push-ups, dips, pull-ups, curls, and even assisted explosive movements, and it is both inexpensive and takes up almost no space. Another benefit of bands is that they provide resistance through the entire rep, unlike free weights.
Chains
Chains are used in some hardcore training setups to increase the resistance as you move up in a lift (like squats, dips, or push-ups). They provide the unique benefit of accommodating resistance, meaning the load increases as you move into the range of motion where you are the strongest.
How to Know It’s Time to Increase Weight
- If you can perform more than 12–15 reps with good form, it’s time to add weight.
- Rate of Perceived Exertion (RPE): If you’re finishing a set with a recommended rep range in a calisthenics workout plan and feel like you could do 3–4 more reps, increase the weight. You must challenge your muscles to see progress.
- If you find that reps that are supposed to be explosive or involve slow eccentrics become effortless, add weight.
- If you haven’t improved in weeks, extra resistance might be what you need.
Calisthenics Workout Plan
Here, you’ll find not one but two workout routines: one for beginners taking their first steps in bodyweight training and one for intermediate-level trainees (and above) who are already familiar with calisthenics and have some months of dedicated training under their belt.
Click here to open the Beginner Calisthenics Workout Plan in StrengthLog.
Click here to open the Intermediate Calisthenics Workout Plan in StrengthLog.
Beginner Calisthenics Workout Plan
This is a simple and beginner-friendly calisthenics workout plan designed to help you build strength, endurance, and confidence in foundational bodyweight movements. You can do it 2–3 times per week, like Monday, Wednesday, and Friday (or any schedule with at least one rest day between sessions). As you can see, it contains three workouts, but if you can only train two days, choose two of them and go go go. They are full-body workouts, so you can pick two and still get a great training week.
Key Principles Before You Start
Warm up properly. Spend 5–10 minutes warming up. Light jogging in place, jump rope, jumping jacks, arm circles, and leg swings—a few exercises that cover your entire body. The goal is to increase blood flow and prepare your joints and muscles, not to tire you out.
Focus on technique. Learning how to perform the exercises with good form is more important than doing a certain number of reps or rushing to more advanced variations. You’ll find descriptions of all the exercises below and in the Strengthlog workout app. If you struggle to do complete reps (the pull-up is a classic example of an exercise that many people will find tough as a beginner), you can start with smaller ranges of motion if needed and gradually increase as your strength improves.
Progress gradually. If the suggested repetitions in the Calisthenics Workout Plan are too challenging, start with fewer and build up. Nothing is set in stone when you are just starting out. Conversely, if you find them too easy, feel free to add reps as long as your form stays on point.
Workout 1
| Exercise | Sets | Reps |
|---|---|---|
| Push-Up | 4 | 8–15 |
| Pull-Up / Inverted Row | 4 | Max reps/8–15 |
| Bodyweight Squat | 3 | 20–25 |
| Lunge | 3 | 10–12/leg |
| Hanging Leg Raise | 3 | 12–15 |
Workout 2
| Exercise | Sets | Reps |
|---|---|---|
| Dips | 4 | 8–15 |
| Pull-Up / Inverted Row | 4 | Max reps/8–15 |
| Step Up | 3 | 20–25 |
| Box Jump | 3 | 10–12 |
| Plank | 3 | 45–60 secs |
Workout 3
| Exercise | Sets | Reps |
|---|---|---|
| Bulgarian Split Squat | 4 | 8–15 |
| Push-Up | 4 | Max reps |
| Pull-Up / Inverted Row | 3 | Max reps/8–15 |
| Glute Bridge | 3 | 10–12 |
| Core Twist | 3 | 12–15 |
Intermediate Calisthenics Workout Plan
This is a 4-week calisthenics workout plan with more workouts, more exercises, more advanced exercises, and built-in progression—in short, more of everything.
To benefit the most from this workout plan, I suggest you have at least several months of serious calisthenics training experience. The training volume is high enough that an absolute beginner might not be able to recover properly from it, and it features some relatively advanced body weight exercises from the get-go.
You train four days per week following this schedule:
- Upper Body (Push & Pull)
- Lower Body + Core
- Upper Body (Push & Pull)
- Lower Body + Core
Which weekdays you train and which you use as rest days doesn’t matter; you can mix and match them to fit your schedule.
Workout 1: Upper Body (Push & Pull)
Warm-Up (3 Rounds)
- Arm circles – 10 forward, 10 backward
- Shoulder dislocations – 10 reps
- Scapular push-ups – 10 reps
Main Workout (3–4 Rounds)
| Exercise | Sets | Reps |
|---|---|---|
| Push-Up | 4 | 8–15 |
| Pull-Up | 4 | Max reps |
| Dips | 3 | Max reps |
| Inverted Row | 3 | 10–15 |
| L-Sit Hold | 3 | 20–30 secs |
| Plank to Push-Up | 3 | 12 reps |
Finisher Superset
Workout 2: Lower Body + Core
Warm-Up (3 Rounds)
- Leg Swings – 10 per leg, front & side)
- Bodyweight Squats – 15 reps
- Glute Bridges – 15 reps
Main Workout (3–4 Rounds)
| Exercise | Sets | Reps |
|---|---|---|
| Bulgarian Split Squat | 4 | 8–12 |
| Step Up | 4 | 8–12/leg |
| Nordic Hamstring Eccentric | 3 | 6–10 |
| One-Legged Glute Bridge | 3 | 8–12/side |
| Calf Raise | 3 | 20–25 |
| Hanging Leg Raise | 3 | 12–15 |
| Core Twist | 3 | 20 |
Finisher
| Exercise | Sets | Reps |
|---|---|---|
| Jumping Lunge | 2 | 20 |
Workout 3: Upper Body (Push & Pull)
Warm-Up (3 Rounds)
- Arm circles – 10 forward, 10 backward
- Band pull-aparts – 15 reps
- Hanging scapular retractions –10 reps
Main Workout (3–4 Rounds)
| Exercise | Sets | Reps |
|---|---|---|
| Push-Up | 4 | 8–15 |
| Chin-Up | 4 | Max reps |
| Dips | 3 | Max reps |
| Towel Row | 3 | 10–12 |
| Pike Push-Up | 3 | 10–12 |
| Superman Raise | 3 | 10–12 |
Finisher
| Exercise | Sets | Reps |
|---|---|---|
| Dead Hang | 2 | Goal: 1 minute |
Workout 4: Lower Body + Core
Warm-Up (3 Rounds)
- Leg Swings – 10 per leg, front & side
- Bodyweight Squats – 15 reps
- Glute Bridges – 15 reps
Main Workout (3–4 Rounds)
| Exercise | Sets | Reps |
|---|---|---|
| Bodyweight Squat | 4 | 20–25 |
| Lunge | 4 | 10–12/leg |
| Box Jump | 3 | 10 |
| Hamstring Curl | 3 | 10–12 |
| Calf Raise | 3 | 20–30 |
| Hollow Body Crunch | 3 | 15–20 |
| Plank with Shoulder Taps | 3 | 15 reps |
Finisher
| Exercise | Sets | Reps |
|---|---|---|
| Burpees | 2 | 15 |
Follow These Training Programs in StrengthLog
These programs and many more are in the StrengthLog workout tracker app. The app is free to use, forever, with no ads.
The Beginner Calisthenics Workout Plan is also 100% free to follow in the app.
The Intermediate Calisthenics Workout Plan however, is a premium program (it offers built-in progression and advanced periodization), which means it requires a premium subscription.
We offer all new users a free 14-day premium trial. You can activate it in the app without any strings attached.
Download StrengthLog and start tracking your workouts today:


The exact set and rep details (the tables above are snapshots of a single week) along with the planned intensity and volume progression route, are available in your StrengthLog app.
Calisthenics Workout Plan Exercises
Here are all the exercises in the Beginner Calisthenics Workout Plan and the Intermediate Calisthenics Workout Plan, in the order they appear, with in-depth descriptions of the benefits of each and detailed step-by-step instructions in text and video.
Push-Up

Push-ups are the bread and butter of bodyweight training—simple, effective, and close to infinitely scalable. Anyone from a beginner doing their first rep to a calisthenics veteran repping out one-arm push-ups need this exercise in their workout plan.
Believe it or not, cranking out push-ups is as effective for building chest and triceps as the barbell bench press, especially in beginners.5
There are endless (or at least several dozen) variations of the standard push-up, and you can easily adapt the exercise to your fitness level. Some examples include:
👶 Beginner:
✅ Wall Push-Ups (Easiest, for absolute beginners)
✅ Incline Push-Ups (Hands on a bench or table)
✅ Knee Push-Ups (Less load, but still effective)
😎 Intermediate:
✅ Standard Push-Ups (The classic)
✅ Pike Push-Ups (More shoulder activation)
✅ Close-Grip (or Diamond) Push-Ups (Triceps focus)
✅ Archer Push-Ups (One arm works harder)
🔥 Advanced:
✅ One-Arm Push-Ups (Unilateral flex)
✅ Feet Elevated Push-Ups (Increases the load on your pecs, delts, and triceps)
✅ Pseudo Planche Push-Ups (More shoulders)
✅ Spiderman Push-Ups (Core + mobility)
⚡ Elite Level:
✅ Planche Push-Ups (Look ma, no feet)
✅ Super Slow Push-Ups (Time under tension)
✅ One-Arm Archer Push-Ups (For true warriors)
Avoid These Common Push-Up Mistakes
🚫 Hips sagging – Engage your core like your gains depend on it.
🚫 Flaring elbows – Tuck them slightly to protect your shoulders.
🚫 Half reps – Go all the way down. Don’t cheat yourself of gains.
🚫 Bouncing off the floor – Controlled reps > fast and sloppy.
When you follow a Calisthenics Workout Plan as detailed in this article, you can start with the kneeling push-up or incline push-up if needed, work your way up to regular push-ups, and advance to push-ups with your feet elevated to challenge yourself as you get stronger.
In the Intermediate routine, you’ll also be doing pike push-ups, where you position yourself in an inverted V-shape, lower your head toward the ground by bending your arms, and push back up, working your shoulders more.
How to Do Push-Ups
- Begin by lying face down on the floor. Place your hands slightly wider than shoulder-width apart, with fingers pointing forward. For regular push-ups, extend your legs back, balancing on the balls of your feet. Keep your knees on the ground for kneeling push-ups instead of extending your legs.
- Ensure your body forms a straight line from your head to your heels (regular) or knees (kneeling). Engage your core muscles to prevent your hips from sagging or sticking up in the air.
- Inhale as you slowly bend your elbows to lower your body towards the floor. Aim to lower until your chest or chin nearly touches the floor. Your body should remain straight throughout the movement, with your lower back in a natural curve. Avoid any sagging or arching.
- Exhale as you push through your hands to straighten your elbows, lifting your body back to the start position. Maintain that straight body line as you push up.
- Repeat the movement for your desired number of repetitions.
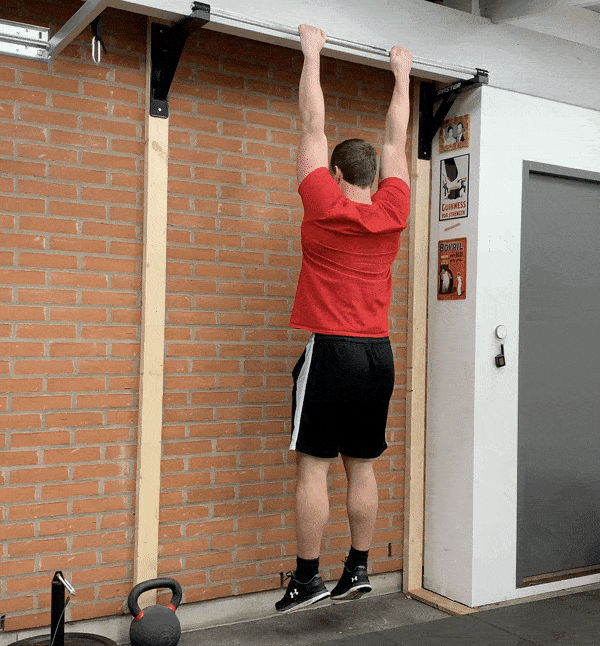
Pull-Up

If there were a Mount Olympus of the best calisthenics exercises, the pull-up would sit on a throne at the top, flexing its mighty lats, biceps, and rear delts while scoffing at machines and dumbbells.
Pull-ups are foundational for bodyweight mastery. They build upper-body strength, muscle control, and endurance, and you look pretty darn impressive when you can crank them out effortlessly. Plus, they pave the way for more advanced calisthenics like muscle-ups, front levers, and one-arm pull-ups.
How to Progress
⚠️ Can’t do one yet? No shame! Start with:
- Negative pull-ups (jump up, lower down slowly)
- Assisted pull-ups (resistance band or training partner)
- Australian pull-ups (horizontal bar, feet on the ground)
- Dead hangs (grip endurance training)
🔥 Want to get better? Try:
- Weighted pull-ups (strap some iron to your waist)
- Archer pull-ups (one-arm dominance)
- Typewriter (flying) pull-ups (side-to-side like an old-school typewriter carriage)
- One-arm pull-ups (the holy grail of upper body pulling strength)
Avoid These Rookie Common Pull-Up Mistakes
🚫 Half reps – Go all the way up and down. Half reps, half the results.
🚫 Kipping (unless you’re CrossFitting) – Use strength, not momentum.
🚫 Shrugging shoulders – Engage your lats, don’t let your traps do all the work.
🚫 Flaring elbows – Keep them under the bar and close to your sides, not chicken-winged.
🚫 Holding your breath – Breathe! In on the way down, out on the way up.
How to Do Pull-Ups
- Stand beneath a pull-up bar and reach up to grasp it with an overhand grip (palms facing away from you), slightly wider than shoulder-width apart. Ensure your grip is secure and comfortable.
- Hang freely from the bar, fully extending your arms. Your feet should be off the ground.
- Engage your core muscles by squeezing your abs and glutes.
- Inhale and initiate the movement by pulling yourself up towards the bar by bending your elbows and squeezing your shoulder blades together. Focus on using your back muscles rather than relying on your upper arms.
- Continue pulling yourself up until your chin reaches or clears the bar. Keep your torso upright and avoid excessive swinging or kicking with your legs.
- Slowly lower yourself back down to the starting position while maintaining control and stability, fully extending your arms.
- Repeat the movement for your desired number of repetitions.
Inverted Row

The inverted row (or Australian pull-up, because you’re “down under” the bar) is a horizontal pulling exercise that primarily hits your upper back (traps, rhomboids), lats, rear delts, along with stabilizers like your core and glutes.
They are the bodyweight equivalent of a barbell row and one of the most underrated back-building exercises in calisthenics, especially for beginners who can’t yet do full pull-ups.
How to Make It Harder
🔥 Elevate your feet – More bodyweight = more challenge.
🔥 Slow down – Tempo reps or pauses at the top.
🔥 Weighted vest or backpack – Adds resistance.
🔥 Archer rows – One arm does most of the work,
How to Make It Easier
🟢 Bend your knees – Reduces leverage, making it easier.
🟢 Higher bar bosition – A more upright body angle makes it more manageable.
🟢 Assisted with feet – Push lightly with your legs to help pull up.
Avoid These Common Inverted Row Mistakes
🚫 Letting your hips sag – If your hips drop, muscle engagement does, too. Keep a tight ship.
🚫 Flared elbows – Keep them at about 45 degrees from your body, not flared out like wings.
🚫 Rushing the reps – If you’re doing them too fast, momentum is doing the work instead of your muscles.
🚫 Neck Craning – Keep your neck neutral; don’t jut your chin forward to reach the bar.
🚫 Half Reps – Pull all the way up and lower fully to get maximum benefits.
How to Do Inverted Rows
- Place a barbell in a rack, high enough for you to be able to hang below it in straight arms, with your heels on the floor. It you don’t have a bar, anything sturdy like a heavy table than won’t flip over will do.
- Grip the bar with an overhand grip, slightly wider than shoulder-width apart.
- Inhale, and pull yourself up as high as you can, or until your chest touches the bar.
- Exhale, while lowering yourself back to the starting position with control.
- Repeat the movement for the desired number of repetitions.
Squat

The squat is a fundamental movement not just for sports and athletic activities but for living in general. In this calisthenics workout plan, you do squats for your quads, glutes, and adductors to build power, muscle endurance, and mobility—skills you can then use to progress to more advanced lower-body exercises.
Once you’re past the beginner stage, you might find that you can crank out dozens of bodyweight squats without breaking a sweat. But do them later in your workout, after other exercises like Bulgarian split squats and box jumps to pre-exhaust your muscles, and they will keep scaling with your fitness level. If they still feel too easy, you can start practicing one-legged pistol squats.
Common Squat Mistakes to Avoid
🚫 Knees collapsing inward.
🚫 Rounding your lower back.
🚫 Not going low enough (half-squats = half results).
🚫 Lifting your heels off the ground—keep them flat on the ground or floor.
How to Do Bodyweight Squats
- Stand with your feet about shoulder width apart.
- Squat as deep as possible.
- Reverse the movement, and return to a standing position.
- Repeat the movement for the desired number of repetitions.
Lunge

The lunge is a unilateral (one-sided) exercise that provides a challenge for your quads, glutes, and adductors while improving your stability and balance at the same time.
Many functional movements you need in athletics and everyday life require unilateral strength, and including unilateral training in your workout routine is essential if you want to optimize that strength.
If you feel forward lunges in your knees, you can do reverse lunges and take a step backward instead.
Common Lunge Mistakes to Avoid
🚫 Knee wobble – Keep your knee aligned with your foot.
🚫 Short steps – A tiny step forward puts pressure on the knee instead of where you want it: your muscles. Go for a full stride.
🚫 Leaning forward/not leaning forward – Make sure you hit the muscles you prioritize: keep your torso upright to work your quads more, or lean forward to hit your glutes.
🚫 Bouncing – Control the movement for best results.
How to Do Bodyweight Lunges
- Take a big step forward with your right foot and sink as deep as possible in a lunge position, without hitting the knee of the left leg in the floor.
- Return to the starting position by pushing yourself back with the front leg.
- Repeat the movement for the desired number of repetitions.
- Switch legs and repeat the above steps with your left foot forward.
Hanging Leg Raise

The hanging leg raise hits your entire core—from the upper and lower abdominal muscles to your obliques to the deep stabilizing muscles that wrap around your spine. You also train your grip strength because you hang with your entire body weight from a bar or rings.
If you’re not quite there yet, start with hanging knee raises; bent knees make it much easier but still effective.
Common Leg Raise Mistakes to Avoid
🚫 Swinging – Momentum is cheating; use your muscles, not gravity.
🚫 Half reps – Aim for a full 90-degree+ range.
🚫 Shrugging shoulders – Engage your lats to control the movement and to prevent stress on your shoulders.
How to Do Hanging Leg Raises
- Grasp a pull-up bar with an overhand grip, shoulder-width apart.
- Hang from the bar with your arms fully extended and your body in a straight line from your head to your heels.
- Engage your core and keep your back straight.
- Raise your legs towards your chest, as high as you can, keeping your back straight and your core engaged.
- Slowly lower your legs back down to the starting position.
- Repeat the movement for your desired number of repetitions.
Dips

Dips are a compound bodyweight exercise where you lower and push yourself up using your arms. They are like a push-up on steroids (but without the actual steroids), build your chest, shoulders, and triceps, and are non-negotiable if you want a powerful upper body.
Some people feel dips in their shoulders (the wrong feeling). Keep your elbows tucked, and don’t overextend at the bottom to protect them.
If you can’t do at least five good reps, work on assisted dips. If you can do 15+, consider adding weight using a weight belt, backpack, or weight vest.
Common Dip Mistakes to Avoid
🚫 Flaring your elbows out – Keep your elbows at about a 45-degree angle to your body to protect your shoulders and maximizing muscle activation.
🚫 Going too shallow – Kower yourself until your upper arms are parallel (or slightly below) to the ground.
🚫 Not going deep enough – Don’t go so deep your shoulders cry for help.
🚫 Using momentum to bounce up and down – no kipping unless you’re doing CrossFit (and even then, proceed with caution for your shoulders’ sake).
How to Do Bar Dips
- Grip a dip station about shoulder-width apart, and climb or jump to get into the starting position.
- Lower yourself with control until your shoulder is below your elbow, or as deep as you comfortably can.
- Reverse the motion and return to the starting position.
- Repeat the movement for your desired number of repetitions.
Step Up

Step-ups are a great lower-body exercise that deserves more calisthenics credit than they get. Why? Because they hit your quads, glutes, adductors, and hamstrings—all in one movement—and improve your balance and coordination.
They are especially awesome for your butt—research shows that they activate your glutes more than squats and hip thrusts, both of which are known as two of the best glute-builders.6
Common Step Up Mistakes to Avoid
🚫 Pushing off with your back leg – If you’re launching yourself up with your back foot, you’re taking away from the muscles you are supposed to work.
🚫 Using a step that’s too high – If you’re struggling to get up without using momentum, the step is probably too high.
🚫 Slamming your foot down – Don’t just drop your foot down. Resist the descent with your front leg.
🚫 Half-repping it – Fully extend at the top to get the most out of step-ups.
How to Do Step-Ups
- Stand in front of a bench, an elevated platform, or step. A step that is approximately knee height or slightly lower is appropriate for most people.
- Place your right foot on the step, ensuring your entire foot is in contact with the surface.
- Use the strength of your glutes and leg muscles to drive your body upward and lift your body upward onto the platform. Avoid using momentum or relying on your back foot to assist you. You want your glutes to do as much of the work as possible.
- Fully extend your right leg, straightening your knee and pushing your hip forward as you rise.
- Lift your back foot off the ground and bring it up onto the step, fully extending your leg.
- Lower yourself in a controlled motion. Maintain control throughout the descent and resist the downward movement with your glute and leg strength.
- Repeat the movement for your desired number of repetitions.
- Step onto the platform with your left foot and repeat the steps above for the opposite leg.
Box Jump

The box jump is an explosive exercise that boosts leg power, speed, coordination, and athleticism. It trains almost every all muscle groups in the lower body, including the quads, glutes, adductors, abductors, hamstrings, and calves.
Start with a lower box and work your way up unless you want a face-to-box situation.
Common Box Jump Mistakes to Avoid
🚫 Jumping too close – Give yourself space to avoid awkward landings.
🚫 Landing too stiffly – Involve more muscle fibers and absorb the impact by bending your knees.
🚫 Skipping the arm swing – Unlike many other exercises, this one depends on moments, so don’t rob yourself of air time.
🚫 Going too high, too toon – Master lower heights first.
How to Do Box Jumps
- Select a box that is appropriate for your fitness level and jumping ability.
- Stand with your feet shoulder-width apart, a few inches away from the box. Your knees should be slightly bent, and your hips pushed back in an athletic stance, like a mini squat.
- Engage your core and swing your arms back to generate momentum. Keep your chest up, and your weight balanced evenly across your feet.
- Push through the balls of your feet, extending your hips, knees, and ankles as you jump up. Swing your arms forward and upward to help propel yourself onto the box. Jump with both feet leaving the ground at the same time.
- As you land on the box, aim to have both feet hit the surface at the same time. Bend your knees slightly to absorb the impact, keeping your chest up and back straight.
- Once you’ve landed on the box, stand up tall, extending your hips completely to finish the jump.
- Step off the box one foot at a time, and reset your stance before attempting the next jump.
- Repeat the movement for your desired number of jumps.
Plank

The plank is one of the most popular ab exercises in and outside of calisthenics and very effective for building core strength, stability, and endurance. It is a static isometric exercise where you hold your body in a straight-line position—like doing a push-up but without the actual pushing part—just suffering.
Once the standard plank becomes easy, give these variants a go for progession:
1️⃣ Increase Hold Time
Add 5–10 seconds every session while maintaining form. This is your basic form of plank progression.
2️⃣ Elevate Your Feet
Place your feet on a bench, chair, or stability ball. The higher the elevation, the more weight on your upper body, and the harder it gets. You can also plank with your feet on a wall—you’ll take some of the load off of your abs, but work more with your legs.
3️⃣ RKC Plank
RKS stands for Russian Kettlebell Challenge, but no kettlebells were harmed in the making of this plank variant. It is like a normal plank, but you clench your fists in front of you and actively pull your elbows and toes toward each other (without moving) while squeezing your glutes, quads, abs, and fists like you’re about to explode.
4️⃣ Single-Limb Planks
- Lift one arm (Plank with Arm Reach)
- Lift one arm and tap your opposite shoulder (Plank With Shoulder Tap)
- Lift one leg (Single-Leg Plank)
- Lift opposite arm & leg (Bird-Dog Plank)
Removing one or more points of contact forces your core to fight rotational forces in addition to gravity, making the exercise more effective for balance and stability.
5️⃣ Spiderman Plank
From a plank, bring one knee towards the elbow, return, and repeat with the other side. Turns the isometric plank into an explosive core exercise, looks cool, and burns a lot.
6️⃣ Plank to Push-Up

Start in a forearm plank, push up into a high plank (one arm at a time), do a push-up, lower back down into a plank, and repeat until regret kicks in. Combines the benefits of push-ups with those of the plank.
You can make it even worse by adding a clap push-up at the top.
7️⃣ Weighted Plank

Add a plate on your back or have someone place a cat on it.
Common Plank Mistakes to Avoid
🚫 Sagging hips – Keep your body in a straight line from head to heels.
🚫 Butt up in the air – Lower your hips so your spine stays neutral and your abs do the work.
🚫 Looking forward – Avoid straining your neck by gazing slightly ahead of your hands to maintain a neutral spine.
🚫 Holding your breath – Turning purple is not a sign of strength.
How to Do the Plank
- Stand on your elbows and feet.
- Brace your abs and try to form and hold a straight line from your head to feet.
- Hold the plank position for the intended length of time or as long as you can.
Bulgarian Split Squat

If you’re into calisthenics and bodyweight training, the Bulgarian split squat is your ticket to powerful legs without needing a squat rack.
It’s a single-leg squat variation where you elevate your rear foot on a surface (bench, chair, step, or whatever stable surface you have at hand) while your front leg does the work, building strength, balance, and flexibility while working your quads, hamstrings, and glutes.
For most people new to calisthenics, your body weight alone is enough to light your quads and glutes on fire. Add a weight vest or hold something in your hands for resistance.
Common Split Squat Mistakes to Avoid
🚫 Letting your front knee cave in – Keep it aligned with your toes.
🚫 Placing your rear foot too high – Keep it just above knee level.
🚫 Rushing the movement – Slow and controlled > fast and sloppy.
🚫 Leaning forward/not leaning forward: – Just like with lunges, align your body to hit the muscles you prioritize (upright for more quads, forward for more glutes).
How to Do Bulgarian Split Squats
- Stand with your back turned against a bench, which should be about knee height. Stand about one long step in front of the bench.
- Place your right foot on the bench behind you.
- Inhale, look forward, and squat down with control until right before your right knee touches the floor.
- Reverse the movement and extend your front leg again, while exhaling. Your back foot should only act as support.
- Repeat the movement for the desired number of repetitions, then switch side and repeat with your right leg forward and your left foot on the bench.
Glute Bridge

Glute bridges look simple, but they get the job done. They pack a serious calisthenic booty-building punch, are great for athletic performance and functional strength, and improve hip mobility and pelvic stability.
Glute bridges can work your hamstrings more or less, depending on how much you bend your knees. If you flex them to ∼90°, you work both your butt and hammies, but the more you flex them, the more your glutes take over.7
Once regular glute bridges start to feel easy, you can progress to single-leg glute bridges (one leg in the air, the other foot driving through the floor), and then to feet-elevated single-leg glute bridges.
Common Glute Bridge Mistakes to Avoid
🚫 Not squeezing your glutes – Just going through the motions won’t activate them properly.
🚫 Overarching your back – Keep your ribs down and core tight.
🚫 Feet too close or too far – Find the stance where you feel your glutes fire maximally.
🚫 Relying on momentum – Slow and controlled for maximum glute gains.
How to Do Glute Bridges
- Lie down with your feet on the floor.
- Tuck the pelvis in to properly activate the glutes.
- Push your hips towards the ceiling by using your glutes, until your body forms a straight line from head to knees.
- Squeeze your glutes at the top.
- Reverse the movement, and repeat the movement for your desired number of reps.
Core Twist

The core twist is a core exercise where you sit on the floor and twist your torso from side to side, either without resistance or holding something suitably heavy to up the challenge. It trains your obliques (side abs), rectus abdominis (six-pack muscles), and transversus abdominis (deep core stabilizers) and builds rotational strength and core stability, useful in many sports and daily movements.
Common Core Twist Mistakes to Avoid
🚫 Relying on momentum – Slow it down and focus on controlled movement.
🚫 Letting the lower back round too much – Engage your core and keep your spine neutral.
🚫 Using your arms instead of twisting your torso – Your arms should move, but don’t lead with them.
How to Do Core Twists
- Sit on the floor with your knees bent and feet either on the ground or lifted slightly off.
- Hold a weight plate, medicine ball, or kettlebell with both hands in front of your chest.
- Lean slightly back with a straight back and engaged core.
- Twist your torso to one side and bring the weight toward your hip, keeping your hips stable.
- Return to the center and rotate to the other side.
- Repeat for the desired number of repetitions.
L-Sit Hold

The L-sit hold looks simple but takes some dedication to master. It’s primarily a core exercise (abs and hip flexors), but it also hits stabilizing muscles from all over your body, including your obliques, quads, chest, front delts, and triceps. It requires quite a bit of stability and body control in addition to just muscle strength.
L-sit holds are tough, but if you stick with them, you build a foundation of strength for more advanced calisthenics like planche progressions, handstands, and front levers.
You can do L-sit holds on parallel bars, parallettes, or the floor (the hardest version due to reduced leverage).
Common L-Sit Hold Mistakes to Avoid
🚫 Shrugged shoulders – Keep them depressed for better control.
🚫 Bent knees – Unless you’re learning the movement and gradually progressing to the full hold.
🚫 Leaning back – Keep your torso upright.
🚫 Holding your breath – Breathe through the tension.
How to Do L-Sit Holds
- Sit on the floor with your legs extended straight in front of you.
- Place your hands on the floor beside your hips, with your fingers pointing forward or slightly outward. If available, you can use parallettes or push-up handles to make the movement more comfortable and provide more space for your legs.
- Tighten your core muscles and engage your quadriceps (front of your thighs) to help lift your legs.
- Push down through your hands to lift your hips off the ground.
- Keep your legs straight and extended in front of you, with your toes pointed, forming an “L” shape with your body. Your arms should remain straight and locked throughout the exercise, and your legs should be parallel to the ground or as high as possible without rounding your back or losing form.
- Hold the L-sit for the desired amount of time.
- Lower your body back to the floor.
Crunch

The crunch is one of the most popular ab exercises and a more controlled, smaller-range, and effective movement compared to a full sit-up, with less strain on your lower back and more direct focus on your six-pack muscles.
You can easily make your crunches more challenging by holding a weight plate, a book, or something similar in front of your chest for added resistance.
Common Crunch Mistakes to Avoid
🚫 Neck pulling – Use your hands for support, not for dragging your head up like an anchor.
🚫 Jerky movements – Slow and controlled wins the race (and builds stronger abs).
🚫 Lifting too high – The crunch is a small lift. Keep the lower back glued down, and don’t turn it into a sit-up.
How to Crunch
- Lie on your back with your hands in front of your chest and your knees bent to about 90 degrees.
- Lift your shoulder blades off the floor by contracting your abs and bending forward.
- Bend as far forward as possible while keeping your low back in contact with the floor, and then return to the starting position.
- Repeat the movement for your desired number of repetitions.
Nordic Hamstring Eccentric

The Nordic hamstring eccentric is the love-hate relationship every calisthenics athlete needs in their life and the best way to build superhuman strength in your hamstrings using only your body weight. It is an eccentric-focused (lengthening) movement where you lower your body forward from a kneeling position, with your hamstrings acting like the brakes to prevent you from faceplanting. It transfers very well to other calisthenics like planche, front lever, and explosive jumping strength and has a reputation for preventing hamstring injuries.8
This is the one exercise in the Calisthenics Workout Plan where you’re going to “cheat.” You’re not doing the concentric (lifting) part because it requires insane hamstring strength. Most people can’t do it, and even pro athletes struggle with it. But hey, if you can do both phases, be my guest. Color me impressed. If not, stick to eccentrics first until (if) you can control the full movement.
Common Nordic Hamstring Eccentric Mistakes to Avoid
🚫 Bending at the hips – Takes the tension off your hamstrings.
🚫 Dropping too fast – You lose the eccentric strength benefits and increase your risk of injury.
🚫 Not anchoring your feet properly – Less tension on your hamstrings and more frustration when you faceplant.
🚫 Letting your lower back arch or sag – Puts unnecessary strain on your lower back and reduces hamstring activation.
How to Do Nordic Hamstring Eccentrics
- Start off standing on your knees with a straight hip. Feet wedged under something immovable, like a heavily loaded barbell, or a strong training partner.
- Lean your torso forward by extending your knees with no hip movement. In other words, do not push your butt backward.
- Control the eccentric movement by fighting the gravitational forces with all your hamstring strength. If possible, try keeping the eccentric phase to two seconds.
- When your chest reaches the floor, push yourself up using your arms and start over.
- Repeat the movement for your desired number of repetitions.
Calf Raise

One of the simplest exercises in the Calisthenics Workout Plan, yet oh so effective, the calf raise involves going up and down on the balls of your feet, and that’s it.
Calf muscles are super stubborn, and you might not see much muscle growth no matter how you push your training, but you’ll still get the other benefits, like improved performance in explosive movements, more stability, and ankle injury prevention.
If regular calf raises with both legs at the same time feel too easy (and chances are they will), switch to single-leg calf raises for an added challenge. You can then progress further by strapping on a weighted vest or holding something heavy in one hand.
Common Calf Raise Mistakes to Avoid
🚫 Rushing the reps – calves respond best to time under tension, not momentum.
🚫 Not using a full range of motion – Drop your heels all the way down, then raise them up as high as you can. The stretch part of the reps is particularly important.
🚫 Letting your ankles roll in or out – Keep the weight centered on the balls of your feet and distribute the weight evenly.
How to Do Calf Raises
- Stand on a solid surface, or an elevation for increased range of motion. Hold on to something for balance.
- Raise your heels by using your calves.
- Lower yourself with control, and repeat the movement for your desired number of repetitions.
Jumping Lunge

The jumping lunge is a dynamic bodyweight exercise where you switch legs mid-air, landing in a lunge position with the opposite foot forward. It hits almost every muscle in your lower body, like a lunge on steroids that works both power and endurance while also cranking up your heart rate.
In this calisthenics workout plan, you’re doing them as a finisher at the end of a lower body session to end it in style with your muscles burning and your blood pumping.
Common Jumping Lunge Mistakes to Avoid
🚫 Slamming your knee into the floor – Control your landing to protect your joints and maximize muscle tension.
🚫 Leaning too far forward – Keep your chest up and core engaged.
🚫 Skipping the depth – A shallow lunge = less work, less burn, less gains.
How to Do Jumping Lunges
- Take a big step forward with your right leg and sink as deep as possible in a lunge position without hitting the knee of the back leg on the floor.
- Explosively jump up, switching the position of your legs while in mid-air. As you land, make sure to soften the landing and go directly into the lunge position with your left leg forward. Your front knee should be over your ankle and your back knee should be pointing down towards the floor.
- Continue alternating legs with each jump. Maintain a steady pace and keep your torso upright throughout the exercise.
- Repeat the movement for your desired number of repetitions.
Towel Row

The towel row is an underrated calisthenics exercise that strengthens the upper back, biceps, and grip using a towel and an anchor point like a door, pole, or railing. It hits your upper back (rhomboids, traps), lats, biceps, rear delts, core, and grip strength.
Towel pull-ups are a great alternative to pull-ups and traditional rows in your calisthenics workout plan, more like an inverted row but with greater grip strength requirements because of the towel handles (if you haven’t used towels as handles before, you might be surprised at how much more they demand from your grip).
Common Towel Row Mistakes to Avoid
🚫 Letting your shoulders round forward – Keep your shoulders pulled back and down.
🚫 Using too much arm and not enough back – Initiate the pull with your back muscles and imagine your arms as cables and your hands as hooks.
🚫 Sagging hips or overarched back – Keep your body in a straight line, tight as a plank.
🚫 Not controlling the eccentric phase – Lower yourself with control to maximize muscle tension.
How to Do Towel Rows
- Wrap a strong towel (or two for extra grip) around a secure object (door, railing, pole, tree branch, etc.) and make sure it won’t slip when placed under load.
- Hold one end in each hand and lean backward at an angle, keeping your body straight like a plank.
- Engage your back, squeeze your shoulder blades together, and pull your chest toward the towel.
- Slowly extend your arms back to the starting position without letting your shoulders slump forward.
- Repeat the movement for your desired number of repetitions.
Superman Raise

The Superman raise (or Superman hold) is a simple yet effective bodyweight exercise that targets your lower back, glutes, hamstrings, and core stability. It’s a staple in calisthenics and bodyweight training and builds posterior chain strength, which improves athletic performance, posture, and injury prevention.
Common Superman Raise Mistakes to Avoid
🚫 Hyperextension (overarching your lower back) – The movement should feel controlled, not like a forced backbend.
🚫 Using momentum – Lift smoothly instead of jerking up into position.
🚫 Rushing the reps – If you speed through the exercise with sloppy form, you’re not using the right muscles.
How to Do Superman Raises
- Lie face-down on the ground, floor, or an exercise mat or towel.
- Extend your arms straight out in front of you, palms facing down, and keep your legs straight behind you, with the tops of your feet on the floor.
- Position your head so that your neck is neutral (looking straight down at the floor). Tighten (brace) your abdominal muscles and squeeze your glutes to stabilize your spine.
- Exhale and simultaneously lift your arms, chest, and legs a few inches off the floor. Keep your head and neck in line with your spine (avoid craning your neck up).
- At the top of the movement, pause briefly.
- In a controlled manner, inhale as you return your arms, chest, and legs back to the starting position.
- Repeat the movement for your desired number of repetitions.
Dead Hang
The dead hang (or bar hang) is the simplest yet effective exercise that most people overlook—probably because it looks too easy. But don’t be fooled—it’s a unique movement (non-movement, actually) in that it not only strengthens your grip, shoulders, and core but also improves your mobility for other calisthenic exercises that require flexible shoulders.
Once you can hang for more than a minute, you can give one-arm bar hangs a go.
Common Dead Hang Mistakes to Avoid
🚫 Letting your shoulders shrug up – Pull your shoulders down and engage your lats to avoid putting stress on your joints.
🚫 Death-gripping the bar – White-knuckling the bar will burn out your grip too quickly.
🚫 Holding your breath – Controlled breathing helps you last longer and not pass out.
🚫 Using only your arms – Excessive body movement kills your control. When you try one-arm hangs for the first time, you’ll be surprised at how much your body wants to twist and turn.
How to Do Dead Hangs
- Grab a bar and hang from it for your desired period of time.
- Just kidding; there is no number 2. That’s it.
Hamstring Curl

Without machines or weights, you are kind of limited to how many exercises you can do for your hamstrings, but the sliding hamstring curl is a stand-out option. Instead of using a machine to bring your heels toward your glutes, you use your own strength and body weight to control the movement.
Common Hamstring Curl Mistakes to Avoid
🚫Dropping your hips – Keep your hips up to fully activate the hamstrings.
🚫 Relying on momentum – If you’re sliding back and forth without control, you’re wasting your time.
🚫 Going too fast – Slow, controlled movements mean maximum muscle activation.
How to Do Sliding Hamstring Curls
- Find a slippery surface (a yoga mat can work if you are outdoors) and lay on your back with your feet on sliders, a towel, or a pair of socks.
- Bend your knees and place your feet flat, hip-width apart. Engage your core and drive your hips up into a glute bridge position.
- Extend your legs outward, straightening them while keeping your hips as high as possible.
- Pause when your legs are almost straight but not locked.
- Pull your heels back toward your glutes, using your hamstrings to drag yourself back up.
- Repeat the movement for your desired number of repetitions.
Hollow Body Crunch

The hollow body crunch is a core exercise that combines a traditional crunch with the hollow body hold, training your six-pack muscles, deep core, obliques, and hip flexors with a combination of static and dynamic tension.
Hollow body crunches are significantly more challenging than standard crunches and take them from “this is fine” to “send help” in about 10 reps, but it is very effective for building muscle endurance and stability—great for gymnastics, calisthenics, and general fitness
Common Hollow Body Crunch Mistakes to Avoid
🚫 Arching your lower back – If your lower back pops off the floor, bring your legs up higher or bend your knees slightly.
🚫 Swinging your arms for momentum – Control your movement and let your core do the work.
🚫 Holding your breath – Breathe in on the way down, exhale as you crunch up.
🚫 Going too fast – Slow, controlled movements force the core to work way more than rapid, jerky motions.
How to Do Hollow Body Crunches
- Lie on your back with your arms extended overhead and your legs straight.
- Engage your core by pressing your lower back into the floor and lifting your shoulders and legs slightly off the ground, like a banana shape.
- Bring your knees toward your chest while simultaneously crunching your upper body forward. Reach your arms toward your shins or knees while keeping your lower back glued to the floor the entire time.
- Extend back into the hollow body position without dropping your legs or shoulders to the ground.
- Repeat the movement for your desired number of repetitions.
Burpees

A burpee is a full-body, high-intensity exercise that combines a squat, plank, push-up, and jump—basically, a mini workout packed into one explosive movement. They’re like that one friend who’s tough on you but always has your best interest at heart. Love them or hate them, burpees will let you know that you are alive, but they are super effective and well worth the effort.
Common Burpee Mistakes to Avoid
🚫 Skipping the full squat – Some people just bend over and slap their hands on the ground instead of squatting down properly. Don’t be that person.
🚫 Half-hearted jumps – Don’t miss out on the most explosive part of the exercise.
🚫 Rushing the reps – Quality over quantity. It’s better to do 10 good burpees than 15 sloppy ones.
🚫 Skipping the push-up – Even if you can’t do a full push-up, lower down slightly. No shame in modifying it, but push yourself when possible.
How to Do Burpees
- Stand with your feet shoulder-width apart.
- Quickly drop into a squat and place your hands on the floor in front of you.
- Immediately jump your feet back into a plank position without pausing.
- Perform a fast push-up to get your chest down to the floor.
- Jump your feet right back toward your hands.
- Explosively jump up, reaching your arms overhead.
- Land softly and immediately flow into the next rep, with no break.
- Repeat the movement for your desired number of repetitions.
Final Rep
You have reached the end of this guide. 🤸
Thank you for reading, and congratulations—you’ve just unlocked the power of calisthenics—no fancy gym, no expensive equipment, just you and gravity getting stronger together.
To follow the calisthenics workout plan in this article, download our workout log app and start tracking your workouts today:
Click here to open the Beginner Calisthenics Workout Plan in StrengthLog.
Click here to open the Intermediate Calisthenics Workout Plan in StrengthLog.
References
- Oxford English Dictionary: Calisthenics.
- Adv Physiol Educ. 2014 Jun;38(2):109–117. doi: 10.1152/advan.00136.2013. The history of “Exercise Is Medicine” in ancient civilizations.
- Encyclopedia Britannica: Calisthenics.
- Br J Sports Med. 2009 Aug;43(8):556-68. The effects of eccentric versus concentric resistance training on muscle strength and mass in healthy adults: a systematic review with meta-analysis.
- Journal of Exercise Science & Fitness. Volume 15, Issue 1, June 2017, Pages 37-42. Low-load bench press and push-up induce similar muscle hypertrophy and strength gain.
- Journal of Sports Science and Medicine (2020) 19, 195 – 203. Gluteus Maximus Activation During Common Strength and Hypertrophy Exercises: A Systematic Review.
- Building a Better Gluteal Bridge: Electromyographic Analysis of Hip Muscle Activity During Modified Single-Leg Bridges. Int J Sports Phys Ther. 2017 Aug;12(4):543–549.
- Br J Sports Med. 2019 Nov;53(21):1362-1370. Including the Nordic hamstring exercise in injury prevention programmes halves the rate of hamstring injuries: a systematic review and meta-analysis of 8459 athletes.