
If you want to take your first steps to a stronger and healthier you, this beginner strength training program has everything you need.
In this program, you’ll find:
- Three workouts per week. The perfect balance between training frequency and volume, with enough rest and recovery for the best results.
- Full-body workouts. The best way for a beginner to see rapid progress. No muscle left behind!
- Only the top exercises for each muscle group, proven to work effectively and safely. No mumbo jumbo or overly complicated movements that might look fancy but do little.
- Time-efficient training. This beginner strength training program is designed to fit into your schedule smoother than a protein shake goes down post-workout.
Click here to jump directly to the training program!
You can track our beginner strength training program for free in our workout log app: 0% ads and 100% gains.


Benefits of Strength Training
Weight training is one of the best things you can do for your body. You get stronger, healthier, and happier.

These are just five of the top benefits that await you when you embark on your beginner strength training program:
- Strength training is like a magic potion for your muscles. It builds lean muscle mass and enhances muscle strength like nothing else you can do. That means you’ll be able to lift heavy weights in the gym, as well as your groceries, kids, or even your spirits, with much more ease.
- Regular strength training is a health injection for almost everything in your body, including your heart. It helps reduce blood pressure and lower bad cholesterol, making your most important muscle tick a bit happier.
- Weight training increases bone density, which is super important, especially as you get older. Think of it as fortifying your skeletal structure, protecting it from injuries and bone-related issues down the line.
- Lifting weights supercharges your metabolism. Muscle tissue is active tissue, and you’ll be burning calories even when you’re just chilling on the couch, like having a calorie-burning furnace working for you 24/7. Even if you’re not going for weight loss, a higher metabolic rate allows you to enjoy more food without gaining body fat. And if you are, strength training ensures you’re losing fat, not muscle.
- Last but not least, lifting weights is a fantastic mood booster. It improves blood flow to the brain and releases endorphins, those feel-good hormones that improve your mood and sense of well-being. Strength training is like a natural, free antidepressant without the pharmacy.
The best thing about strength training is that it is for everyone. No age restrictions exist, and it’s never “too late to start lifting.” On the contrary, the older you are, the more important it is to include regular strength workouts in your life. The saying “age is just a number” might not be entirely accurate, but resistance exercise is the closest thing we have to an elixir of youth.
Read more:
>> 20 Science-Backed Benefits of Strength Training
Beginner Strength Training Program Terms and Concepts
When you are new to strength training, many of the words and concepts that are standard jargon might be unfamiliar to you. Instead of assuming you already know the “secret language” of the gym (don’t worry, it’s not as complex as it might seem at first glance), let’s go through the basic concepts you need to know before embarking on your beginner strength training program.
Reps and Sets
Reps and sets are two of the most important things to understand in a workout program. If you’re new to strength training, you might wonder what they mean.
- In gym-speak, a rep is one complete movement of an exercise – like a single push-up or a one-time bicep curl. For example, in a bicep curl, lifting the weight up and then lowering it back down counts as one rep.
- A set is a group of consecutive reps. For example, doing 10 of those bicep curls in a row (that’s your reps) counts as one set. You then rest for a bit (usually 1–3 minutes depending on the exercise; you likely need more rest after a set of 10 squats than after that set of bicep curls) before doing your next set.
If you repeat this cycle a few times, like doing 3 sets of 10 bicep curls with rest in between, you’re on your way to becoming a rep-and-set pro. Beginners might only do a set or two per exercise, while experienced powerlifters can spend an hour or more doing set after set of the same exercise.
Rest Intervals
A rest interval is the time between sets when you recover and get ready for the next.
You don’t have to time your rest intervals to the second. When you feel ready for your next set, you likely are ready.
Standard recommendations for most lifters are 2–3 minutes for compound exercises and 1–2 minutes for isolation exercises.
- Compound exercises are ones like the squat, bench press, and deadlift, where you use several joints and muscle groups to lift the weight.
- Isolation exercises are movements where you only use one joint, like when doing bicep curls.

If you’re aiming for the best strength gains, think of your set rest as your best gym buddy. You’ll want to chill out for about 2–3 minutes between sets. Why? Because your muscles and nervous system need time to recover for you to perform your best. But again, don’t worry about timing your set rest precisely.
Progression: The Key to Your Fitness Goals
Progression is the cornerstone of all types of exercise, including strength training. Without progression, your body adapts to your current training, and you stop seeing strength gains, muscle growth, and improvements in your fitness level.
Think of it like leveling up in a video game. You start battling small foes (lifting lighter weights or doing only a few sets), and as you get stronger, you challenge bigger bosses (heavier weights, more reps, or tougher exercises). Progression is about gradually increasing the difficulty of your workouts.
Without progression, your muscles get comfy and stop improving. When you have just started lifting weights, your muscles aren’t used to the loads you are suddenly putting on them, and they start growing bigger and stronger from even a small amount of training.
However, as the weeks and months pass, they find they can now handle the weights you’re forcing them to lift.
What a relief! We can stop growing bigger and stronger now. We’re good as we are; no need to get better.
That’s when you must up the challenge and trick those lazy muscles into improving again. You can do that in several ways, like lifting heavier weights as you get stronger, do more sets per workout, or rest shorter time between sets.
How to Progress the Beginner Strength Training Program
For this beginner strength training program, your progression will be in the form of increasing the weight when you can.
Add more plates to your barbell, or use heavier dumbbells. This is the most basic and important part of strength training: as you get stronger, you increase the weight you lift, get stronger again, and repeat.
For example, if the program calls for 8–10 reps of bicep curls, start with a weight you can do eight reps with. Once you can do 10, increase the weight a little so you can only do eight again, and start working towards doing 10 with that weight.
As you gain experience, you generally need more training to keep improving. This beginner strength training program keeps the training volume relatively low because you don’t need a lot of extra exercises and sets beyond the basics at this point.
Last but not least, progression gives you more than muscle gains. It is also a big motivational boost. Seeing yourself lift heavier, do more reps, or conquer tougher exercises is the thrill that keeps you coming back, workout after workout. And that’s the key to long-term results: consistency.
Beginner Strength Training Program: Workout Days
In this beginner strength training program, you train three days per week, alternating between two different workouts.
Week 1:
- Monday: Workout A
- Tuesday: Rest
- Wednesday: Workout B
- Thursday: Rest
- Friday: Workout A
- Saturday: Rest
- Sunday: Rest
Week 2:
- Monday: Workout B
- Tuesday: Rest
- Wednesday: Workout A
- Thursday: Rest
- Friday: Workout B
- Saturday: Rest
- Sunday: Rest
Of course, you don’t have to train on these exact days; the above is just an example that fits many people because of free weekends.
Do three workouts per week with at least one day of rest in between, and you can move the training days around to fit your schedule.
Beginner Strength Training Program: Two-Day Version
Perhaps you can only train two days per week. Or you may have a hectic week and can’t lift weights as often as usual.
That’s OK! Three workouts give you better results than two, but it’s a relatively slight difference, unlike going from one weekly workout to two.
If you can only do two sessions, you do Workout A on one day and Workout B on another. The only thing to keep in mind is to squeeze in at least one rest day between training sessions.
Beginner Strength Training Program: The Workouts
Each workout in the beginner strength training program trains the major muscle groups in the body, and the exercises complement each other for balanced muscular development.
The program is based on the most effective compound exercises that give you maximum bang for your invested time and engergy buck, complemented with isolation movement that zero in on smaller but no less important muscles.
The rep scheme allows for both great strength gains and muscle growth, and the set volume makes for relatively short and sweet training sessions.
Workout A
| Exercise | Sets | Reps |
|---|---|---|
| Squat | 3 | 6–8 |
| Overhead Press | 3 | 8–10 |
| Barbell Row | 3 | 8–10 |
| Tricep Pushdown | 2 | 8–10 |
| Leg Curl | 2 | 8–10 |
| Crunch or Hanging Knee Raise | 2 | 10–12 |
Workout B
| Exercise | Sets | Reps |
|---|---|---|
| Deadlift | 3 | 5–6 |
| Bench Press | 3 | 8–10 |
| Lat Pulldown | 3 | 8–10 |
| Barbell Curl | 2 | 8–10 |
| Leg Extension | 2 | 8–10 |
| Standing Calf Raise | 2 | 10–12 |
Warming Up for the Beginner Strength Training Program
Warming up before lifting is crucial because it prepares your body for the action-packed workout you’re about to embark on, like preheating your oven before baking a batch of muscle muffins.
A good warm-up increases your heart rate, sends blood flowing to your muscles, boosts performance, and reduces the risk of you pulling something that shouldn’t be pulled. It’s also a great time to mentally prepare, like a pep talk for your muscles and brain.
Now, for a full-body weight training workout like the ones in the beginner strength training program, we want a comprehensive warm-up for the entire body. Here’s a fun, all-in-one routine:
- Cardio: 3–5 minutes. The exercise bike, elliptical machine, jump rope, or a brisk walk or jog on the treadmill: whatever type of cardio you like. Don’t go all-out; the goal is to get warm, not tire you out.
- Arm Circles: 1 minute. Imagine you’re an airplane ready to take off. Small circles, then gradually increase to larger ones.
- Torso Twists: 1 minute. Stand with your feet shoulder-width apart and twist your torso from side to side, keeping your hips stationary.
- Leg Swings: 30 seconds each leg. Swing your legs back and forth like a pendulum.
- Bodyweight Squat: 15–20 reps.
- Push-Up Against Wall: 15–20 reps.
Now, you should be warm and ready to conquer that strength training session!
In addition, you don’t want to jump straight into the heaviest set of each exercise. Do a couple of so-called “ramp-up sets” for each exercise, starting with an empty barbell or a pair of light dumbbells. They warm you up further and allow your brain and muscles to strategize and prepare for the upcoming work, improving coordination and focus.
Beginner Strength Training Program: The Exercises
Let’s go through each exercise of the beginner strength training program in detail and learn what each one does, why they belong in the program, and how to perform them safely and as effectively as possible.
Workout A
Here’s your first workout of the week. Most of the default exercises are based on barbell training, but you’ll find alternative exercises using dumbbells and machines that are just as effective.
1. Squat

The squat is one of the most effective – if not the single most effective – exercises for building muscle and strength and improving your overall athletic performance.
It is the bread and butter of leg days for beginners, intermediate lifters, athletes, and bodybuilders. For older adults, it is one of the key exercises for maintaining physical functionality and improving quality of life.1
Squats are an excellent way to strengthen your lower body muscles, particularly your glutes and quads. These muscles are the powerhouses of your body, and improving their strength and power translates to better performance in almost all everyday activities and sports.
When you squat, you mimic natural movements like sitting and standing, improving joint stability and coordination. You prevent injuries and enhance your functional movement pattern. What does that mean in real life? In short, your body gets better at doing whatever you need it to do, like picking up dropped keys or squatting down to pet a dog.
Some people are worried that squats might hurt their back or knees, but research shows that even deep squats do not increase the risk of injury in your back or knees.2 On the contrary, as long as you learn correct form and practice progressive overload (you gradually increase the load as you get stronger) they strengthen your body and protect against injury.
How to Squat
- Place the bar on your upper back with your shoulders blades squeezed together. Inhale and brace your core slightly, and unrack the bar.
- Take two steps back, and adjust your foot position.
- Squat as deep as possible with proper form.
- With control, stop and reverse the movement, extending your hips and legs again.
- Exhale on the way up or exchange air in the top position.
- Repeat the movement for the desired number of repetitions.
Don’t be discouraged if you feel like a wobbly flamingo at first. Keep at it, and you’ll be a squat pro in no time. Focus on form over weight to start.
Alternative exercise: leg press. If you prefer machines over free weights, that’s fine. The leg press is a great alternative that works the same muscles as the squat but with a machine’s comfort and ease of use.
Squat Pros ✔️
- Simple equipment. Barbells and weight plates are cheap, standardized, and available in every good gym. You can even do bodyweight squats without any equipment at all.
- Proven track record. The squat has ample evidence showing that it is effective for building muscle, increasing strength, and improving vertical jumping and sprinting.
- Real-life strength. The squat is more similar to lifting objects in real life than the leg press, which gives it the edge as a functional exercise.
- Easily modified. The squat can be varied by simple means to fit your body type or training goals better, for example by doing box squats, jump squats, or front squats.
Leg Press Pros ✔️
- Easy to learn. The learning curve of the leg press is very low, and most people can get a good leg workout in the very first time they try it.
- Stable. The stability of the leg press means that you can focus more on the muscles being worked, and train closer to full exertion without risking a loss of balance. It also means the leg press is more accessible to people with compromised balance, such as the frail or elderly.
- A little safer. Unless you are an experienced barbell squatter who knows how to set up safety racks or get out from under a failed barbell squat, I think it’s fair to say that the leg press, with its built-in locks and safety pins, is a slightly safer exercise.
2. Overhead Press

The overhead press is a classic exercise that targets many of the major muscle groups in your upper body: your shoulders, upper chest, and arms. It even strengthens your core muscles and improves the stability of your entire body. It’s the full package and a “wonderful addition for beginner to advanced trainees” according to the National Strength and Conditioning Association.3
The overhead press is a true functional movement. Lifting things over your head is a day-to-day move for hoisting groceries or lifting your kid, grandchild, or little cousin into the air. Ever stashed luggage in an overhead bin? That’s your overhead press in real-life action.
More than being a powerhouse exercise for muscular strength and functional performance, the overhead press is like a chisel for your deltoids, turning those shoulders into boulders. If you ever wanted broader shoulders, the overhead press is your best friend and an essential part of a beginner strength training program.
In addition, regular overhead pressing helps improve posture, turning you from Quasimodo to a more confident and upright you.
When you’re new to the overhead press, starting with a lighter weight (or even a broomstick) is a good idea to get the movement down.
How to Overhead Press
- Place a barbell in a rack at about chest height.
- Grip the bar slightly wider than shoulder-width apart and step close to it.
- Tighten your abs like you’re bracing for a tickle attack. This keeps your back safe and adds oomph to your press.
- Unrack the bar and let it rest against your front delts while you step back from the rack. This is your starting position.
- Push the barbell up, extending your arms fully.
- Bring the weights back down to your shoulders, slow and controlled.
- Exhale as you push up, inhale as you lower. This isn’t just a workout tip; it’s a life tip. Breathing is generally recommended.
- Repeat the movement for the desired number of repetitions.
You can also do your overhead presses seated. The seated overhead press hits your shoulders and triceps the same way, but you don’t get the core activation and stability training from the standing version of the exercise.
Alternative exercises: dumbbell overhead press (standing or seated), machine overhead press. Prefer dumbbells or machines? No problem. You can do dumbbell or machine shoulder presses instead of the traditional barbell overhead press. However, remember that the standing dumbbell press is the only one of the alternatives that gives you the same core and stability benefits.
3. Barbell Row
For the third exercise of the beginner strength training program, it’s time to turn our attention to the rear of the body, more specifically the upper back, with the barbell row.
Out of sight and too often out of mind, training your back muscles is at least as important as the front. They quietly support your every move, keep you upright, and help you lift heavy stuff and perform daily tasks with ease. Ignore it, and you might find yourself groaning every time you pick something up. Not to mention that a muscular back makes you look good from all angles.
Just like you wouldn’t eat a pancake that’s only cooked on one side, your body needs balance. The barbell row is all that: a fantastic exercise for all muscles in your upper and middle back, including your lats, rhomboids, trapezius, the erector spinae muscles that run along your spine, and even your rear deltoids.
How to Perform Barbell Rows
- Grasp the barbell with an overhand grip, slightly wider than shoulder-width apart.
- Stand with your feet slightly wider than feet hip-width apart, bend your knees slightly, and hinge forward at your hips, maintaining a straight line from your head to your hips.
- Brace your core and keep your back straight. Inhale and pull the barbell towards your lower chest or upper abdomen, keeping your elbows close to your body. Squeeze your shoulder blades together at the top of the movement.
- Lower the barbell back to the starting position in a controlled manner.
- Repeat the movement for the desired number of repetitions.
Alternative exercises: dumbbell row, machine row. If you can’t or don’t want to use a barbell, you have excellent dumbbell and machine alternatives at your disposal.
4. Tricep Pushdown

So far, we’ve focused on compound exercises in the beginner strength program. Those are movements that involve multiple muscle groups and joints simultaneously. They are the bread and butter of a strength training workout.
However, it can be challenging to cover all parts of the body without isolation exercises, movements that use a single joint, and zero in on a specific muscle group. That’s where the next exercise comes in: the triceps pushdown.
Your triceps, the muscle at the back of your arms, is crucial whenever you do a pushing movement. Whether you’re bench pressing or just pushing open a heavy door, your triceps are there to lend a hand.
Strengthening the triceps also stabilizes your elbow joint. That means less chance of injuries, so you can keep lifting, pushing, and flexing safely.
Your triceps are involved in pressing movements like the overhead press you did earlier in the workout routine and chest exercises like the bench press. However, a few sets of direct triceps work guarantees that your arms won’t be a weak link.
The tricep pushdown is the ideal beginner’s triceps exercise. It’s easy to learn, and you can feel it hitting the right muscles.
The most common mistake when doing triceps pushdowns (not just a beginner mistake either!) is using too much weight and body movement. Many people tend to recruit their body weight or momentum to bring the weight down rather than isolating and focusing on the triceps.
To fix this, stand straight with a slight forward lean, lock those elbows by your sides, and let your triceps do all the work. Think of your arms as a hinge – your lower arms should be the only moving parts.
How to Perform Tricep Pushdowns
- Stand facing a cable machine with your feet comfortably apart. Grip the bar with an overhand grip, keeping your hands about shoulder-width apart. Your elbows should be slightly bent, and your upper arms close to your sides and perpendicular to the floor.
- Engage your core and maintain an upright posture throughout the exercise to help stabilize your body and isolate the triceps.
- Start by extending your arms downward, focusing on pushing the bar down towards your thighs. Keep your upper arms close to your sides and stationary during the movement.
- As you lower the cable, squeeze your triceps and focus on contracting the muscle. Feel the tension in your triceps as you fully extend your arms.
- Return to the starting position by allowing the cable to rise back up using the same path. Maintain control throughout the ascent.
- Repeat the movement for the desired number of repetitions.
5. Seated Leg Curl

You kicked the beginner strength training program off with the squat, one of the best lower-body exercises of all. But great as it is, it doesn’t effectively work the hamstrings, the muscles at the back of your legs.
The next exercise on the agenda, the leg curl, isolates your hamstrings like no other and ensures balance between them and your quadriceps muscles at the front.
Strong hamstrings contribute to your overall lower body strength, improving your performance in sports, running, and even daily activities. They make you jump higher, run faster, and kick stronger.
Strong hamstrings reduce the risk of injury, especially in any physical activity involving running, jumping, or sudden stops. Think of them as your body’s built-in shock absorbers. Just like the shock absorbers in your car, they need to be in tip-top shape for your vehicle (that’s your body!) to operate smoothly.
Alternative exercise: lying leg curl. You can do either lying or seated leg curls depending on what machines you have available and which one you prefer. Research shows that the seated variant is more effective, but they are both excellent exercises for your hamstrings.4
How to Perform Leg Curls
- Adjust the machine so that you are correctly positioned. Your knees should be in line with the machine’s joint.
- Lift or push the weight down (depending on whether you chose the lying or seated leg curl) by bending your knees as far as possible.
- Slowly lower or let the weight back again.
- Repeat the movement for the desired number of repetitions.
6. Crunch or Hanging Knee Raise


It’s time for the final exercise of the first workout in the beginner strength training program. Well done! We’re finishing the session with an abdominal exercise, either the crunch or the hanging knee raise. Pick whichever you enjoy, or switch it up every other workout for variety.
Training your abs is about more than just looking good at the beach (though that’s a nice bonus). Whether you’re into sports, chasing after a bus, or trying to stay upright on a slippery sidewalk, a strong core keeps you balanced and safe.
Strong abs protect your spine. When your core is weak, your other muscles have to pick up the slack, and they’re not too happy about it. A weak core can lead to injuries, and nobody’s got time for that.
Chiseled abs might be the poster child for fitness, but their real superpower is keeping you strong, stable, and injury-free.
Crunches
The abdominal crunch is a classic that targets your rectus abdominis, the top layer of your abs, or “six-pack.” It’s fantastic for beginners because you need zero equipment – you just lie down on the floor and start sculpting your abs, one crunch at a time.
You can add resistance by holding a weight plate, a dumbbell, or even your cat to your chest as you crunch away.
How to Perform Crunches
- Lie on your back, with your hands in front of your chest and your knees bent to about 90 degrees.
- Lift your upper body by contracting your abs and bending forward.
- Bend as far forward as possible while still keeping your low back in contact with the floor, and then return to the starting position.
- Repeat the movement for your desired number of repetitions.
Hanging Knee Raise
This exercise is a powerhouse not just for your abs but also for your hip flexors and obliques. It’s a step up in challenge from the crunch and requires something sturdy to hang from.
How to Perform Hanging Knee Raises
- Grasp a pull-up bar with an overhand grip, shoulder-width apart.
- Hang from the bar with your arms fully extended and your body in a straight line from your head to your heels.
- Engage your core and keep your back straight.
- Bend your knees and raise your legs towards your chest, as high as you can, keeping your back straight and your core engaged.
- Slowly lower your legs back down to the starting position.
- Repeat the movement for your desired number of repetitions.
That’s workout A done! Good job! After one or two rest days, the next session will be workout B, another full-body workout with different exercises that perfectly complement the ones you just did.
Workout B
And look at that – here we are, ready for workout B.
You might still feel sore from the last workout if you just started out, especially the first week. Experiencing muscle soreness after a workout, particularly if you’ve tried a new exercise program or ramped up your intensity, is normal and expected. It’s known as DOMS (Delayed Onset Muscle Soreness) and peaks around 24-48 hours after your workout.
It is not harmful to train with muscle soreness, but if it is more like “Ouch, I can’t move” rather than “Hmm, I feel the last workout,” take another day to recover.
That being said, let’s jump straight into today’s exercises, starting with one of the classics: the deadlift.
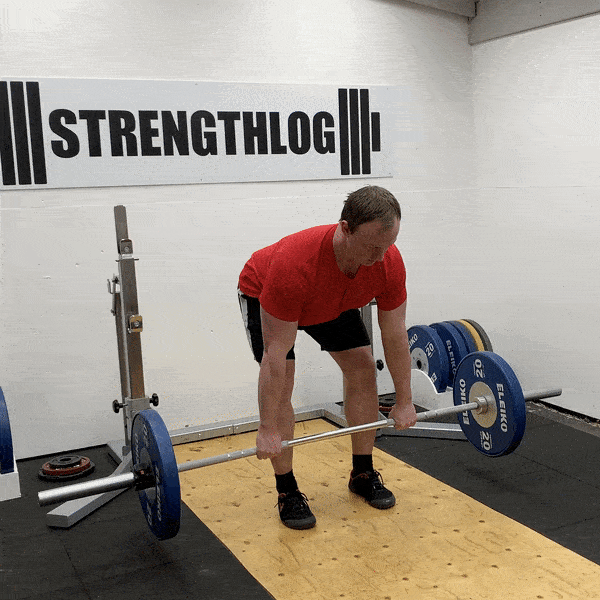
1. Deadlift

Few exercises are more versatile than the deadlift. It is one of the three lifts in powerlifting and one of the best exercises you can do to strengthen your entire body.
Deadlifting involves lifting a weight (usually a barbell) off the ground to the level of your hips and then putting it back down. It’s almost a full-body workout in itself! Mainly, it targets your hamstrings, glutes, and lower back, but your quadriceps, upper back, arms, and core get to join in too! It even strengthens your forearms and grip, which is handy for opening stubborn pickle jars.
Deadlifts give you strength you can use not just in the gym but in different ways in everyday life. Like hoisting a couch while moving or picking up five bags of groceries in one trip because two trips are for quitters. And do it without throwing out your back!
Begin with a manageable weight. There’s no shame in starting with an empty barbell. It’s not a competition… unless you’re actually in a powerlifting competition. But for now, focus on keeping your back straight, chest up, and the bar close to your body. You don’t want to go from zero to Hercules in one day.
How to Deadlift
- Stand with your feet hip-width apart, with your toes pointing slightly outward. The barbell should be over the middle of your feet, close to your shins.
- Bend at the hips and knees to reach the bar. Grip the barbell slightly wider than shoulder-width apart. You can use an overhand grip (both palms facing you) or a mixed grip (one palm facing you and the other facing away).
- Keep your back straight and chest up. Engage your core and ensure your shoulders are slightly in front of the bar. Your hips should be higher than your knees but lower than your shoulders.
- Pull the bar close to your body, with a straight back, until you are standing straight. Keep the bar close to your body, and your arms straight throughout the lift. The bar should travel in a straight line vertically.
- Reverse the motion by hinging at the hips and bending the knees. Lower the bar to the starting position in a controlled manner, maintaining a straight back.
- Reset your position if necessary.
- Repeat the movement for your desired number of repetitions.
Alternative exercises: dumbbell deadlift, trap bar deadlift. You can also do deadlifts with dumbbells instead of a barbell or use a special trap bar, which offers some benefits over the traditional deadlift, including being easy to lift with good form and putting less stress on your lumbar spine.
2. Bench Press

It’s back to the front of your body, as it is time for likely the most popular exercise of all: the bench press.
When you’re in the gym, the training bench is more than just a place to rest between sets. It’s also where you do the exercise many lifters consider the undisputed king of chest exercises: the bench press.
A beginner strength training program isn’t complete without a chest press movement, and the bench press is the cream of the crop. It primarily targets your pectorals (that’s your chest muscles), but it’s also fantastic for your triceps and front deltoids. When you’re pushing that barbell up, you’re not just working your chest; you’re coordinating a whole team of muscles.
Heavy bench presses are fun, but ego lifting is a no-go. Start light, learn the movement, keep the barbell under control without bouncing it, and gradually increase the weight.
How to Bench Press
- Lie on the bench, pull your shoulder blades together and down, and slightly arch your back.
- Grip the bar slightly wider than shoulder-width apart.
- Inhale, hold your breath, and unrack the bar.
- Lower the bar with control, until it touches your chest somewhere close to your sternum.
- Push the bar up to the starting position while exhaling.
- Take another breath while in the top position, and repeat the movement for your desired number of repetitions.
Alternative exercises: dumbbell bench press. The dumbbell chest press is a great alternative to the traditional barbell bench press. You won’t be able to handle as much weight, but you get a more extended range of motion, which can boost muscle development.
3. Lat Pulldown

The lat pulldown is a champion at targeting the latissimus dorsi, those big muscles on your back that kind of look like wings. It’s also a real biceps blaster. In fact, one study found it to be just as effective as the barbell curl for building bulging biceps, at least for beginners.5 Perfect for a beginner strength training program!
You typically do this exercise on a machine with a pulley system, sitting down and pulling a bar from above your head towards your chest. It’s like a pull-up, but sitting down and with adjustable weights. Unlike pull-ups, which can be a nightmare if you’re just starting with resistance training, lat pulldowns let you adjust the weight easily. So, you don’t have to lift your entire body weight, making the lat pulldown ideal for building a stronger back regardless of your fitness level.
Avoid swinging your body to bring the weight down. If you’re swinging, it’s time to reduce the weight. Look straight ahead and focus on squeezing those back muscles. Think of it like you’re trying to hold a pencil between your shoulder blades.
How to Perform Lat Pulldowns
- Sit on the lat pulldown machine and adjust the thigh pad to fit snugly against your thighs.
- Reach up and grasp the wide bar attachment with an overhand grip (palms facing away from you), slightly wider than shoulder-width. Ensure your grip is secure and comfortable.
- Keep your feet flat on the floor and sit with your back straight and chest up.
- Take a deep breath and engage your core strength to maintain a stable torso throughout the exercise.
- Begin the movement by pulling the bar down towards your upper chest while keeping your elbows pointed to the sides. Imagine bringing your shoulder blades together as you pull down.
- Continue pulling until the bar is below your chin or touches your upper chest. Maintain control and avoid using momentum to swing or jerk the weight.
- Squeeze your lats in the contracted position, slowly release the tension, and allow the bar to rise until your arms are fully extended. Maintain control and proper form throughout the entire range of motion.
- Repeat the movement for your desired number of repetitions.
4. Barbell Curl

The biceps might be a small muscle, but in gym culture, they are often seen as a badge of strength and fitness. And even if you don’t care all that much about their visual appeal, strengthening your biceps helps you perform everyday tasks, too.
Despite their size, biceps are crucial in many daily activities. They’re the muscles you count on when you’re carrying groceries or lifting boxes. Stronger biceps mean you’ll be better at lifting and pulling, and visually, your biceps are front and center, making you look great in any t-shirt.
Much like you train your triceps with pressing exercises, your biceps are hard at work when you do pulling movements for your back. However, most people need at least some direct biceps work to develop and strengthen them fully.
The barbell curl is perfect for beginners. It’s a straightforward exercise that’s easy to get the hang of. Just remember that proper form trumps using heavy loads at any cost when curling. Keep your elbows pinned to your sides, and do not swing the barbell to get it moving. Lift with your biceps, not your ego.
How to Perform Barbell Curls
- Stand up straight with your feet hip-width apart.
- Hold the barbell with an underhand grip at around shoulder-width or slightly wider. Your palms should be facing forward.
- Bend elbows and curl the barbell up towards shoulder height, keeping your elbows close to your sides.
- Continue curling the bar until your forearms are nearly vertical and the bar is close to your chest. Squeeze your biceps at the top of the movement for a second to maximize the contraction.
- Lower the barbell back to the starting position with control.
- Repeat the movement for the desired number of repetitions.
Alternative exercise: dumbbell curl. If you want some variation or prefer dumbbell work, the dumbbell curl is just as effective as the barbell curl. Using dumbbells can also be easier on your wrists than curling a barbell with your hands in a fixed position.
5. Leg Extension

While squats are your go-to move for developing overall lower-body strength and muscle mass, the leg extension zero in on your quadriceps or “quads,” those awesome muscles at the front of your thighs, and nothing else. It’s all about isolating these muscles, making them work solo to lift the weight.
Also, even though the squat is a fantastic exercise, it doesn’t work one of the four quadriceps muscles very well. We’re talking about a muscle in the middle of the front of your leg called the biceps femoris. It’s also called the “kicking muscle” because it’s the most important muscle for extending your knee.
Leg extensions, on the other hand, are great for the entire quads, including the kicking muscle (which makes sense, as you’re actually kicking the weight up in a controlled manner.) That makes the combination of squats and leg extensions on different days in your beginner strength training program perfect for covering almost all muscles in your lower body (and the deadlifts and leg curls take care of the rest).
For best results, keep it smooth and controlled, and squeeze your leg muscles at the top of the movement. Your quads will feel like they’re hosting a fireworks show, but embracing the burn gives them their moment in the muscle-building spotlight.
How to Perform Leg Extensions
- Adjust the machine so the pad is just above your feet, with a ∼90-degree angle between your upper and lower legs.
- Sit on the seat and place your ankles behind the pad, ensuring that they align with the pivot point of the machine.
- Grip the handles on the sides of the machine for stability.
- Engage your core and maintain an upright posture.
- Extend your legs, raising the weighted bars in a controlled manner. Focus on the quadriceps muscles as you move.
- Ensure that the motion is smooth and that you’re not using momentum or jerking the weight up.
- Extend your legs fully, hold this position for a moment, and squeeze your quads.
- Lower the weight back to the starting position with full control.
- Repeat the movement for the desired number of repetitions.
6. Standing Calf Raise

Hang in there – you’re almost done with the second workout of your beginner strength training program! We’re finishing at the bottom of the body with standing calf raises, the best exercise for building muscle and strength in your calves.
Building strong calves means building a solid foundation for both everyday activities and athletic endeavors. They are crucial for maintaining balance: strong calves = strong stance. Also, calf raises strengthen the muscles and tendons around your ankles, reducing the risk of ankle rolls and injuries.
In addition, stronger calves boost your performance and muscular endurance in everyday life and sports. They give you more power in your push-off and absorb the impact of each step, whether you’re climbing stairs, sprinting, chasing after the bus, or taking a Sunday stroll.
Be sure to use a full range of motion, going all the way up by pushing through the balls of your feet and getting a full stretch at the bottom—limited range of motion = limited results.
How to Perform Standing Calf Raises
- Adjust the shoulder pads or the platform of the calf raise machine according to your height.
- Step onto the foot platform of the machine. Position your feet hip-width apart with the balls of your feet on the edge of the platform and your heels hanging off.
- Rest your shoulders under the pads and stand upright with your back straight.
- Lift your heels as high as possible, pushing through the balls of your feet. Focus on using only your calf muscles to perform the movement.
- Once you have reached the top of the movement, hold the position for a second or two to maximize the contraction in the calf muscles.
- Lower your heels back down, going past the level of the platform if the machine allows, to get a full stretch in the calf muscles.
- Repeat the movement for the desired number of repetitions.
If you do not have a calf raise machine, you can hold a dumbbell in one hand and do one-legged calf raises while standing on a stable elevation like a thick weight plate.
That’s Workout B done, too! Next training day, you go back to workout A.
Try to increase the weights each workout. Don’t worry if you can’t; just try again next workout.
Tips to Get Started with the Beginner Strength Training Program
Here are five muscle-tastic tips to get you started on your strength training journey.
- Don’t try to lift the whole gym on day one. Begin with lighter weights and gradually increase the load.
- Focus on proper form rather than how much weight you can lift. Better form leads to better gains and less chance of injury. Strength training is a very safe form of exercise, but sloppy form has no place in a beginner strength training program.
- Muscles aren’t just built in the gym but also on your couch! Rest days are crucial. Take at least one day off between training sessions.
- You don’t need a strict meal plan to enjoy the benefits of strength training! However, you do need to provide your body with enough energy, nutrients, and protein to recover faster and get stronger.
- And most importantly, have fun! Strength training is not a race but a journey, like a marathon but with a lot of grunting, so enjoy every rep and every set.
How Long Should You Follow the Beginner Strength Training Program?
As a beginner, you will see rapid progress. You might get noticeably stronger from one workout to the next. However, as time passes, gains come slower, and you might reach the point where you’re no longer a beginner. Your muscles get wise to your tricks, and the gains slow down. That’s when you need more stimulus to goad your muscles into improving further.
A golden rule in strength training is: if it works, keep doing it. There is no need to change a program for the sake of change itself. Some trainers claim that you should randomly switch your exercises and workouts up from week to week to “confuse” your muscles, but that is mumbo jumbo. Your muscles adapt to progressive overload, and the best way to accomplish that is to have a set series of exercises and increase your training weights over time.
If you’re wondering if the time has come to move on from the beginner strength training program, consider these questions:
- Are you making progress? Are you getting stronger over time? If you are, there is little to no reason to change to another program. Don’t try to fix what isn’t broken.
- Does your program still align with your goals? For example, this training program introduces you to the many health benefits of regular lifting, makes you stronger, and adds lean muscle mass. It’s a great all-round beginner’s routine. But let’s say that you, a month in, find that you enjoy lifting heavy more than anything else and would like to take a shot at powerlifting. Then, you might want to switch to a dedicated powerlifting program.
- And perhaps most importantly: are you still having fun? All strength training programs can start to feel stale if you do the same workouts for too long.
In short, if you experience plateaus or boredom, it might be time to switch things up.
- You could give StrengthLog’s Upper/Lower Body Split Program a go: four workouts per week, splitting the body into two upper-body days and two lower-body days. It’s one of our most popular programs, and also 100% free.
- If you enjoy the full-body approach, you can step things up with StrengthLog’s Full Body Workout Routine, another popular intermediate program focusing on muscle growth.
- Or you could check out our many different bodybuilding splits or powerlifting programs.
However, again, don’t feel the need to rush to advance to another program. This beginner strength training program doesn’t suddenly stop working after a set number of weeks. Keep adding weight when you can (progressive overload), and you will keep gaining strength and muscle training three days per week in this time-efficient and effective way for as long as you enjoy it.
Track the Beginner Strength Training Program in StrengthLog
The Beginner Strength Training Program and 80+ other workouts and programs are available in the StrengthLog workout tracker. Both this program and StrengthLog itself are 100% free. We do offer a premium version (and all new users can activate a free 14-day trial of premium in the app) with additional functions, but all basic functionality (and this program) is completely free – forever. It’s like a personal trainer in your pocket.
In addition, a workout log is the best way to keep track of your progress.
Remember that progressive overload is the key to consistent gains over time. To continue making progress, you must gradually increase the demands on your muscles.
A training log helps you stay consistent, set and achieve specific goals, track your progress over time, identify patterns in your training, and hold yourself accountable to your fitness goals.
Read more:
>> How to Effectively Use a Workout Log App
Download StrengthLog for free, keep track of your weights and reps, and try to beat your previous numbers each workout.


Final Words
If you’re new to fitness, this beginner strength training program is the ideal introduction. It isn’t just a set of exercises; it’s the start of a new, stronger, more confident you.
It won’t be long until you notice favorable chances: you look better, feel stronger, and everything in your daily life becomes easier. For many people, lifting weights doesn’t transform just the body but both their physical and mental well-being, all for the better.
Strength training is the best thing you can do for your body, health, and overall well-being. And there has never been a better time to pick the weights up for the first time than right now.
References
- Sports Med. 2020 Jun;50(6):1051-1057. Selection of Resistance Exercises for Older Individuals: The Forgotten Variable.
- Sports Med. 2013 Oct;43(10):993-1008. Analysis of the load on the knee joint and vertebral column with changes in squatting depth and weight load.
- Exploring the Standing Barbell Overhead Press. Strength and Conditioning Journal 39(6):p 70-75, December 2017.
- Medicine & Science in Sports & Exercise 53(4):p 825-837, April 2021. Greater Hamstrings Muscle Hypertrophy but Similar Damage Protection after Training at Long versus Short Muscle Lengths.
- Asian J Sports Med. 2015 Jun; 6(2): e24057. Single vs. Multi-Joint Resistance Exercises: Effects on Muscle Strength and Hypertrophy.